Thursday 15 February 2018

Stash Busting Challenge - Week 2

Hi everyone, sorry this post is a little late.  We have been super busy with half term activities, days out and visiting family.  

So continuing with the stash busting, more granny squares, large ones this time.  For this blanket I have used Stylecraft Special dk in shades of Pale Rose, Mocha, Parchment, Duck Egg, Soft Peach and Cream.


 I joined the squares with single crochet from the back in Pale Rose, which leaves a lovely dotted line of colour on the front of the blanket.


 A simple border of pretty shells to finish it off.


Ta Da! blanket three finished...


 ...looking for a new home.


I loved the way the pink and duck egg blanket turned out and wanted to make something similar for a boy.  So I exchanged the pink and peach for Copper and Stone Nepp in Life dk.


For this blanket I used a round of bobble edging in Duck Egg to finish it off.


Ta Da! Blanket four finished.


Now available in my Etsy store... 


The stash busting will continue next week...
By for now
Catherine
x

Sunday 4 February 2018

Stash Busting Challenge - Week 1

Well hello everyone!  This week has been all about grannies.  I have managed to burn through a substantial amount of my stash already and have two finished blankets to show you.  I have also made a start on two other blankets that will hopefully be ready to show you next week.  So with out further ado, here's what I've been up to this week...

For my first blanket I wanted some very girly.  I first rummaged through my stash finding all the pinks and purples and any other shades that were colourful but nothing too dark.  I even used up some of those dodgy variegated yarns that I never could find a project for.  You know, the ones you buy on a whim, sure that you will find something amazing to make with them; but in reality they sit in a box under the bed never to see the light of day again.

My first square...


...led to another...


 ...and another...


...and another.  Making granny squares is very addictive.


Very soon I had a whole stack of them.  Enough to make a small baby blanket.


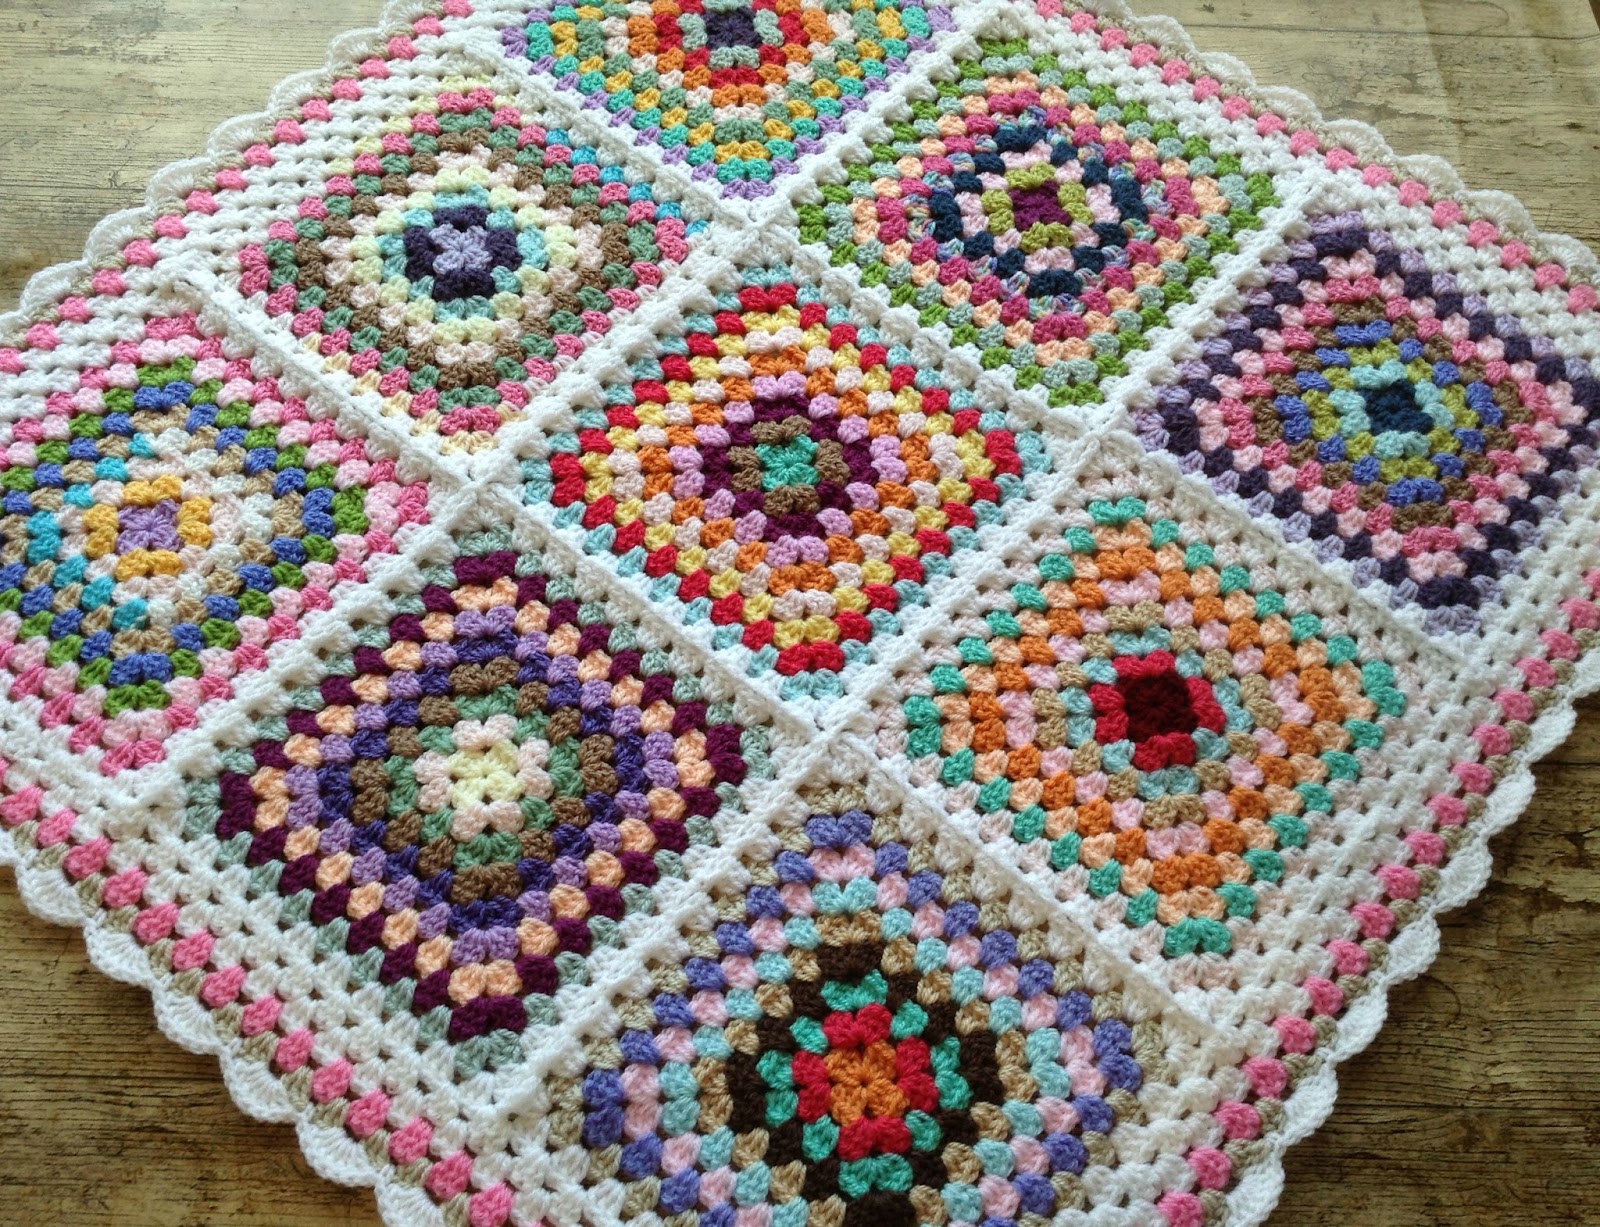
I chose white to join the squares together and used the continuous join as you go method.  I find this method saves you so much time and with the bonus of hardly any ends to weave in.  You can find a great tutorial for this over at The Patchwork Heart.


For the border I kept it simple with a couple of rounds of granny clusters and finished it off with a round of pretty white shells.


Ta Da! Project one from my stash busting challenge finished. 


All this blanket needs now is a new home...


We have a very similar story for my next blanket.  This time I wanted to use up some of my brighter colours.


I love working with bright colours, they always make me feel so cheerful.


The squares soon added up to... 


  ...a whole pile...


 ... ready for joining.


Once again I used the continuous join as you go method, choosing soft Slate grey to really make the bright colours stand out.  A row of bobble edging adds the finishing touch.


 ...and in no time at all, the grannies became a lovely squishy blanket.  Just waiting for someone to snuggle up in.  Of course little T just had to test it out.


Ta Da!  Blanket number two finished


This blanket didn't stay in my shop very long and has already been shipped off to its new home.


Come back and see me next week when I have more stash busting exploits to share with you.
By for now
Catherine
x

Don't forget to head over to my Facebook page for daily posts!

Sunday 28 January 2018

Stash Busting Challenge!

Well the new year is rushing forwards at break neck speeds.  We are almost at the end of January and I have hardly had time to think let alone make a post on my blog.  So here it is, a little late but happy new year everyone!  

So who has made any new years resolutions?  Are you sticking to them?  I don't know about a resolution for the whole year but I am setting myself a challenge for February.  I have so much yarn, quite frankly ridiculous amounts.  The photos show my stash of dk (only the ones already broken into).  I also have a load of tubs all sorted into similar colours...


...so through out February I am challenging myself to see how many blankets I can make, without buying any new yarn.  I am thinking granny squares will be the way to go, perfect for using up all those odds and ends.  Perhaps you would like to join me in my Stash Busting Challenge?  I would love to see your photos if you do.

See you next week with my first blanket.

Catherine
x

Don't forget to check out my Facebook page for daily posts...


Sunday 24 December 2017

Reindeer Trail at Black Park Country Park

Black Park Country Park in Wexham boasts over 10 miles of wood and heath land, tracks and trails.  Best of all, at this time of year is the delightful reindeer trail, situated along the lake path.  The lake was partially frozen from the cold spell we have had and little T enjoyed watching the birds skating across the ice. He made a great game of trying to break through it with pebbles...


As we walked around the lake we came upon all of Santa's 8 reindeer one by one.  Reminding me of Clement C Moore's poem...

"More rapid than eagles his coursers they came,
And he whistled and shouted and called them by name:
Now Dasher! Now Dancer! Now Prancer and Vixen.
On Comet! On Cupid! On Donner and Blitzen!"


But where is Santa's favourite reindeer?  We hadn't seen him yet...  We stopped for a while at the adventure playground until little T had played to his hearts content and then popped into the cafe for a well deserved bacon sandwich and cup of tea to warm us up.

After a little break we continued our walk around the lake, finally finding the one reindeer we were still looking for.  There he stood in all his glory with holly antlers and a big squishy red nose.  Rudolph! 


All in all a lovely morning spent in the fresh air enjoying the country side.  If you live nearby and have little ones be sure to visit and see how many of Santa's reindeer you can spot.

Have a wonderful Christmas

Catherine
x

Sunday 29 October 2017

Zombie Meatloaf with Mashed Brains

So getting in the Halloween mood, today we had Zombie Meatloaf with Mashed Brains for lunch.


We used this fantastic meatloaf recipe by Chef John of Food Wishes and you can watch how to make it here


I think our zombie may need the dentist!

For the Mashed Brains...
Simply boil up a few potatoes with some beetroot and mash.  Add a little cream, a nob of butter and season with a pinch of salt.


 Totally gruesome!
x

Saturday 28 October 2017

My Cath Kidston Inspired, Vintage Granny Flower Blanket

It is always a really exciting time for me when I get commissioned to make a new blanket.  Especially when asked to make one in Cath Kidston inspired colours.  I have always loved her gorgeous fabrics, stunning colour combinations and the vintage feel to her designs.  So here is my Vintage Granny Flower blanket...


For this blanket I have used Stylecraft Special Aran and a 5 mm hook.  The blanket measures approximately 110 x 110 cm.
Colours used:
Pomegranate, Fondant, Baby Pink, Lemon, Meadow, Cloud Blue and Cream.

I started by making the flowers.  I don't use a pattern for this but there are many available on the internet as it is just a simple granny flower design.  I just love this combination of colours.  These are my happy colours!


Once all the flowers were finished I worked a couple of rounds in Cream, to make them into squares.  


The squares were then joined with Cloud Blue.  I used the continuous join as you go method.  You can see a video tutorial for this here.


Finally a border of simple shells to frame the blanket and...

...Ta da!


I hope my customer loves the blanket as much as I have loved making it.

Happy hooking!

Catherine
x


There has been so much interest in this blanket and requests for a pattern that I decided to write one. The printable PDF version can be found in my Etsy or Ravelry store, or click here for the free version.

Don't forget to check out my Facebook page for daily posts...

This post contains Amazon affiliate links...


Sunday 15 October 2017

Pumpkin Treacle Tart Recipe

Hello lovely people.  Well it just feels like summer again here.  The last few days have been gloriously warm.  I spent the whole day yesterday with little T at our allotment garden.  It was so lovely to just sit and watch the bees buzzing around and listen to the birds singing.  There is nothing more beautiful than the sound of British bird song.  We got quite a bit of work done too, dug up some more potatoes, a bit of weeding, harvested all of our corn (something had totally stripped a few of the cobs, rats maybe?  So thought it had better be harvested before they got the lot).  Little T planted some cabbage and Kale seedlings and some onions and garlic in his garden too...

We harvested our largest pumpkin last week even though it wasn't completely ripe (something had been nibbling it).  It was quite a beauty we tried to weigh it and got an EEEE message, too heavy for the kitchen scales.  Tried the bathroom ones next and it came in at just over 2 stone.  Not bad for our first attempt at growing them.  I chopped it into large pieces and roasted it in the oven for about 40 mins.  When it was cool I peeled and chopped it and then divided it up into roughly 400g portions to freeze.  We have had 2 pumpkin pies so far (which little T loves) and some pumpkin pancakes for breakfast this morning.  They were also very tasty.  Both recipes are by Chef John from Food Wishes and you can try them out here

Chef John's Pumpkin Pie...


and Pumpkin Pancakes.


Now the pancake recipe only used around half of my freezer bag portion of pumpkin, so I needed to find something else to make with the leftovers.  I also had some stale bread lying around and half a tin of golden syrup that has been sitting at the back of my cupboard for who knows how long, so I wondered if I could make something between a pumpkin pie and a treacle tart.  So here we have my Pumpkin Treacle Tart recipe...

Pumpkin Treacle Tart


Ingredients:
250g ready made short crust pastry
200g pumpkin puree
4 slices of stale bread (blitzed into breadcrumbs)
1 egg
1/2 tsp mixed spice
1/2 tsp nutmeg
1 tsp cinnamon
4 tbsp golden syrup  
2 tbsp melted butter

First you need to preheat your oven to 200 c (you may need to adjust for fan ovens), then roll out your pastry and line an 8 inch cake tin or pie dish or whatever you can find that's the right size and shape.  Next you simply combine all the other ingredients, it couldn't be easier.  Pour your yummy syrupy, pumpkiny, spicy mixture into the pie case (this smells sooo delicious), if you have any left over pastry you can create a lattice over your pie but this is optional.  Pop into the oven for 20 minsand then turn your oven down to 180 c and cook for a further 20 minutes.  Your treacle tart should look lovely and golden brown.  Leave in the tin for 5-10 mins before turning out.  


You can eat this either hot or cold, but really who can wait that long?  Perfect with just a dollop of cream or you can go with custard or some lovely vanilla ice cream and of course the obligatory cup of tea...


Enjoy!
x