Tuesday 23 April 2019

Learn how to Crochet a Solid Granny Square and What to Make With Them...

Hello and welcome to Tutorial Tuesday, a new series I am starting aimed at beginner crocheters and people wanting to learn new stitches or improve their skills.  This series will include lots of tips, tricks, how to's and ideas and inspiration.  This week I will be showing you how to make a solid granny square and include ways to use them...
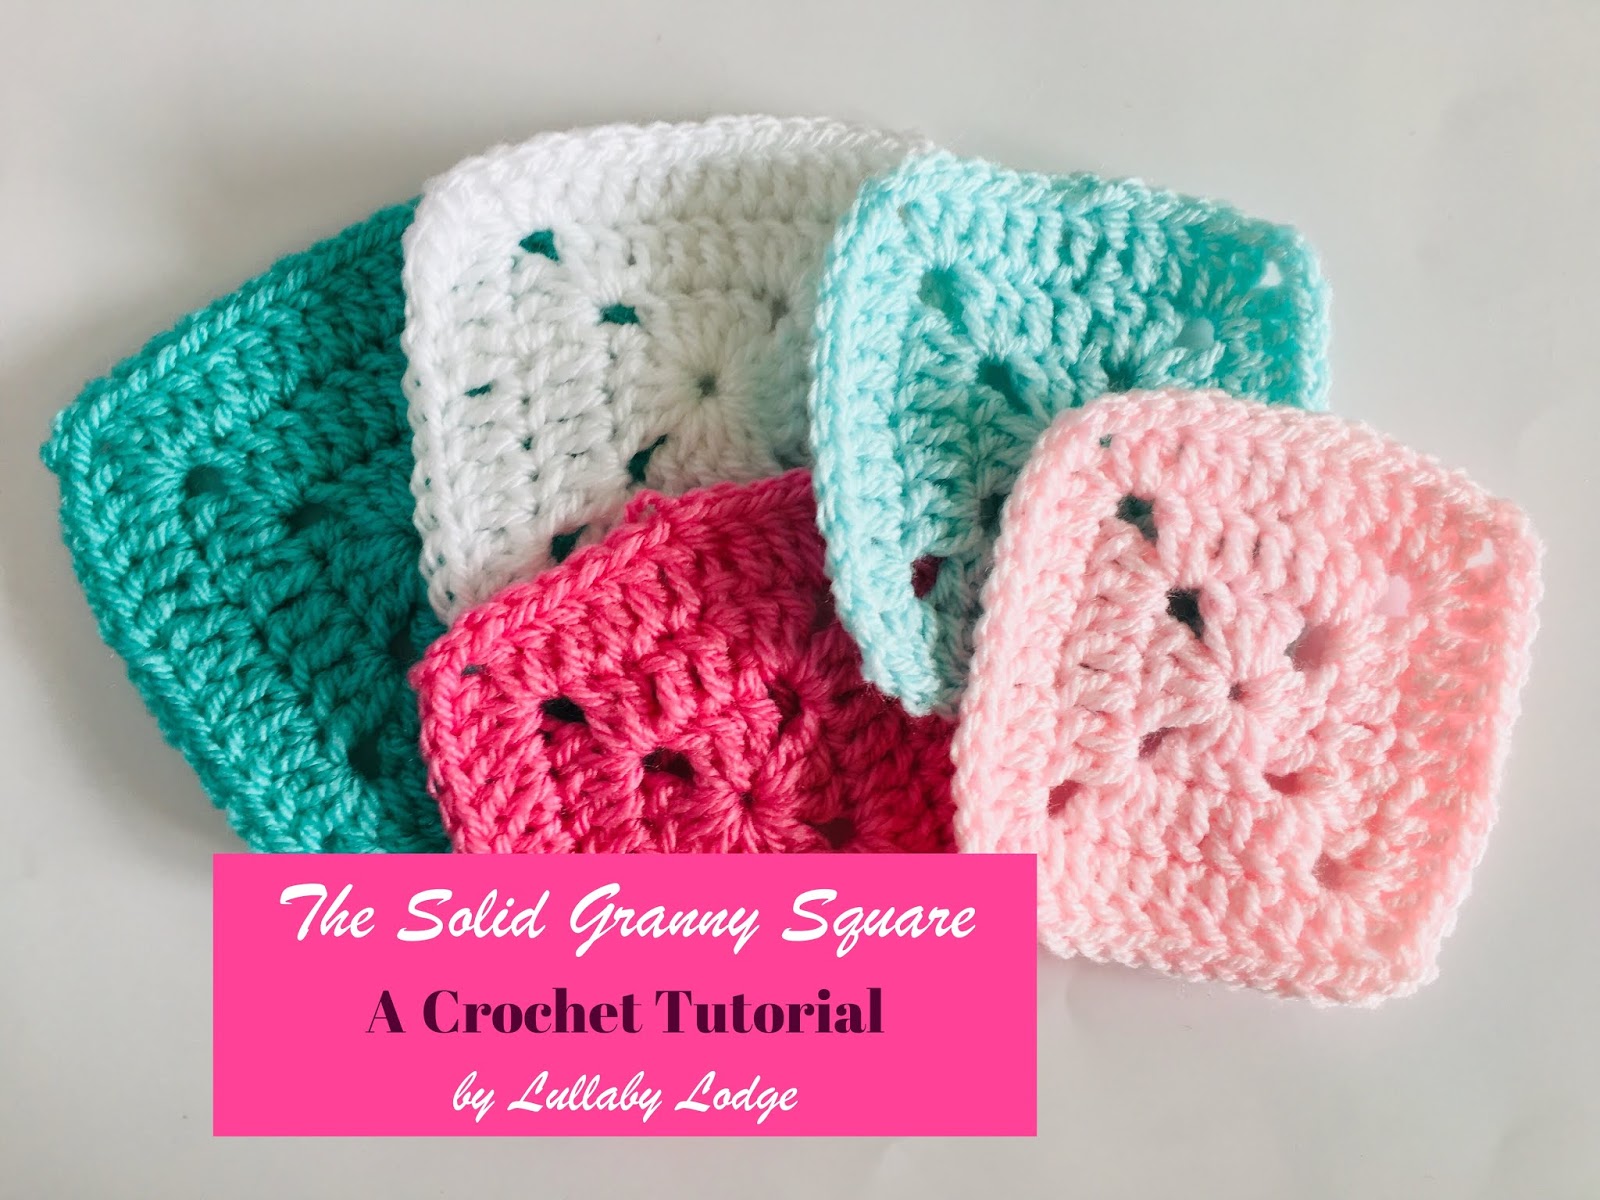


Solid Granny Square


Materials

Yarn
Darning needle
Scissors

Abbreviations / Terms

US terms are used throughout (UK terms)
dc - double crochet (treble crochet)
ch - chain
sl st - slip stitch
st(s) - stitch(s)


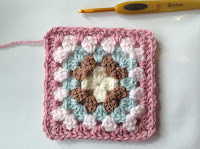
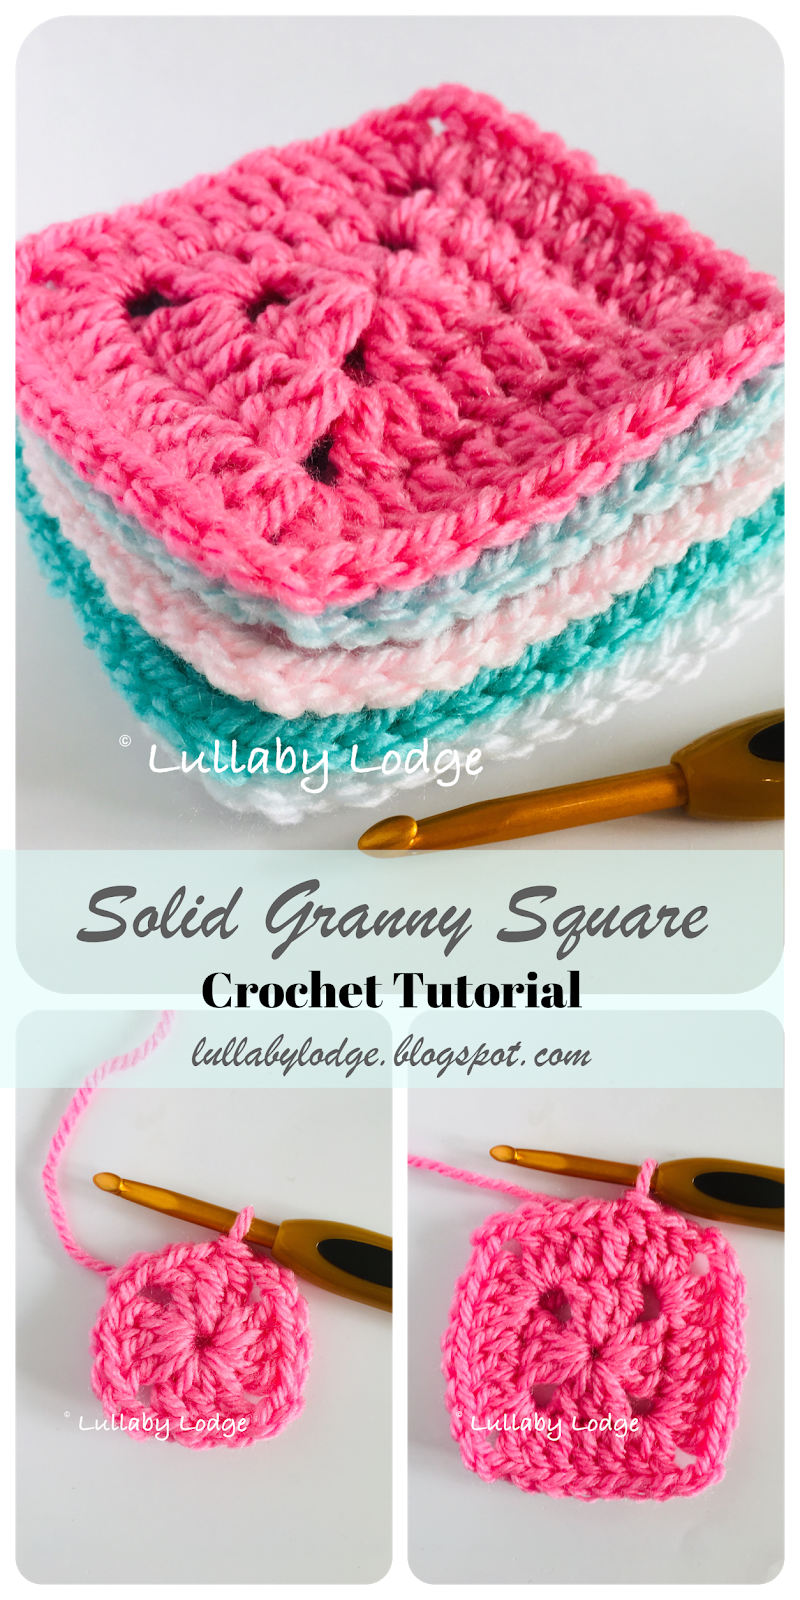
Notes:  I used Stylecraft Special Aran in colours Baby Mint, Baby Pink, Fondant, White and Aspen, with a 5mm (H) hook to make my squares;  but you can use any weight yarn you like, just be sure to use the hook size recommended on your yarn ball band.  Thinner yarns will make smaller squares and subsequently, thicker yarns, bigger squares.  The finished size of my 3-round squares is approx 3 ½ inches (9cm).

I like to use a chainless dc to start my rounds instead of the usual ch3, so feel free to to substitute this for yourself if you wish.

With chosen yarn and hook, ch4 and sl st to form ring.


Round 1 ch3, 2dc into ring, [ch2, 3dc into ring] 3 times, ch2.  Join with sl st to top ch3.


Round 2 ch3, dc in next 2 st's, 2dc in corner sp, ch2, 2dc in same sp.  [dc in next 3 st's, 2dc in corner sp, ch2, 2dc in same sp] x3.  Join with sl st to top ch3.


Round 3 ch3, along each side, dc in each dc across.  In each corner, 2dc, ch2, 2dc.  Join with sl st to top ch3.


Repeat round 3 until square is desired size...


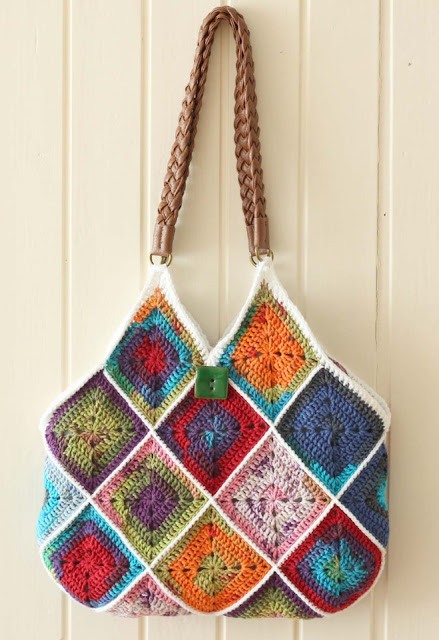
Make a whole bunch and you can use them for anything from granny square blankets, to hot water bottles, to wall art.  This stunning bag is designed by the late "Wink" and features a ton of gorgeously colourful solid granny squares.  The pattern is still available on her blog, A Creative Being.

Squares Bag


Kristen from Cozy Things, made this super comfy cushion with her solid granny squares and you can read all about it on her blog here...

Crochet Patchwork Pillow - Farewell to the scraps


Why not mix your solid granny squares with these daisy motifs and make a pretty baby blanket.  The pattern for this blanket is available in my online stores.

Thank you for reading and I hope you found this tutorial helpful.  If there are any tutorials you would like to see please let me know in the comments below and be sure to subscribe and follow (in the sidebar) so you don't miss any new posts.


Take care for now...
Catherine
x


This post contains Amazon Affiliate links...

I love to listen to audiobooks while I crochet, why not try Audible from Amazon.  You can try free for 30 days with no obligation to buy...


You might like...


The Granny Flower Square


How To Make The Perfect Granny Square (without twisty corners)...


Monday 22 April 2019

Craft Fair Idea #5 Nail File Holders - 2019 Craft Fair Season - WRMK Envelope Punch Board Tutorial

Hello and welcome to my 2019 Craft Fair Series.  This week I have been making these really cute nail file favours.  They make wonderful teacher gifts, work colleague treats or stocking stuffers.  What?  Too soon for Christmas I hear you say?  It's never too soon to start stocking up and getting ready for the holiday season.  I got this idea from Septeria18 on Youtube and I will link her video at the end.

Nail File Holders


Materials


Designer series paper (12x12)
Envelope punch Board (optional)
Bone folder (optional)
Paper trimmer / scissors
Glue
Nail files
Scoreboard (optional)
Hole punch (optional)
Embellishments
Plastic sleeves (optional)


First cut your paper at 1 ½ inches.


Then score at 4 ¼ inches and fold along the scoreline.


Burnish with your bonefolder.  If you don't have a scoreboard or bonefolder just measure and fold.


With your paper still folded and using your We Are Memory Keepers envelope punch board, line it up at the 4 ½ inch mark.  Punch, flip over and punch again.


It should look like this...  If you don't have a punch board you can totally leave your edges straight.


Then open your paper and line up your fold line in the centre of the punch area.  Punch and flip over and punch again.


Next take your glue and adhere along the straight edges, leaving the indented parts unglued.


Like this...


You can now shape the top of your holder by lining it up as in the photo, punch flip over and punch.


This gives it a nice curved edge.  You can also punch a hole here for adding ribbon later.  Again this step is optional, you can decorate your holders however you please.


You can now slide in your nail file.  I got mine from Poundland but you can get them from Amazon, they do some really pretty ones.


Embellish however you like...


I used ribbon, twine, sticky gems, paper punches and stamps to decorate mine.


I added plastic sleeves for a more professional look and to keep them clean ready for the craft fair.


I really had fun making these and I hope you will have a go yourself, they are so easy to produce and make wonderful gifts.


If you liked this tutorial be sure to subscribe to my blog.  You can do this by hitting the follow button in the sidebar or you can sign up for email notifications.  I post a few times a week so make sure you don't miss out on any new posts.

Take care
Catherine
x

Gift Pocket Packaging Idea - Septeria18


This post contains Amazon affiliate links...


You might enjoy...

Project Life Note Card Sets


Friday 19 April 2019

Get Set For Summer! Six Stunning Crochet Sun Hats - Free Pattern Selections

Hello, it's Freebie Friday and the weather is really warming up now.  So it's time to break out the sunglasses, whack on some sun cream and keep your head cool with these gorgeous crochet sun hats.  Here are six of my favourites, including hats for girls, boys, you and even dolly...

Crochet Sun Hats Six to Make


Take a trip down memory lane and crochet this hat inspired by The Little House series.  Pattern by Crochet For You.

Straw Sun Hat


This one is perfect for the little girl in your life.  Crocheted in pretty cotton.  Pattern by Daisy Cottage Designs.

Shell Stitch Sun Hat


This next pattern is great for both girls and boys and is designed by My Hobby is Crochet.

Ocean and Sun


This stunning hat by Drops Design features a pretty shell brim, perfect for keeping cool and looking pretty...

Dune Hat


This super cute linen stitch hat comes in 4 sizes and even one small enough for your doll.  The pattern is designed by A Crocheted Simplicity.


Linen Stitch Sun Hat


Finally another adorable hat by My Hobby Is Crochet.

Let The Sun Shine


I hope you enjoyed these selections and if you did why not subscribe to my blog.  You can do this by clicking the Follow icon in the sidebar or your can sign up for email subscription if you prefer.  I post every week so be sure to subscribe...

back soon...
Catherine
x

This post contains Amazon affiliate links...


You might enjoy...


Saturday 13 April 2019

Craft Fair Idea #4 Cute Note Card Packs - 2019 Craft Fair Series

Hello friends and welcome to another addition of my 2019 craft fair series.  This week I have been making these really cute note card sets.  They are so easy to make using Project Life Cards, some designer paper and a few other crafty bits and pieces.  I have chosen to keep my designs super simple so I can mass produce them for the craft fair.  I just wanted something that will be quick and easy to make for a bargain buy.  I got this idea from one of my favourite Youtubers Lyriclover810, she makes some really beautiful things and has a great craft fair series on her channel.  You should really go check her out and I will link her video at the end...


Project Life Note Card Packs


Materials

Designer series paper
Paper trimmer or scissors
Project Life Cards (or any journaling cards)
Glue (I prefer to use tape runners)
Envelope punch board
Bone folder (optional)
Scoring board (optional) 
Corner rounder (optional)

Using a paper trimmer or scissors cut your single sided designer paper to 8 ½ inches by 4 ¼.


You now want to score this at 4 ¼ inches (this part is optional but can help to stop your paper cracking) you can go ahead and just fold this in half lengthways if you don't have a scoring board.


Use your bone folder to burnish the edges to make them nice and crisp.


For a more professional look go ahead and round your corners with a corner chomper (this is also optional, you can leave them square if you wish).  You now have a base for your card.


Pick a Project Life Card that compliments your chosen designer paper (you can buy these from Amazon I will link them at the end).


Using your prefered glue attach the Project Life Card to your base like so...


You can leave them just like this for a simple note card, or go to town with embellishments...


I added some washi tape and a cute handmade butterfly sticker to this one...


Now we need to cut either some matching or contrasting designer paper for the envelope (or you could just use printer paper for white ones).  You need to cut a square measuring 6 ¾ by 6 ¾.  Now we are going to make our envelope using the envelope punch board.  If you don't have one of these I really recommend getting one, they are so simple to use and so much fun.  You can make so many things with them not just envelopes.  I will have another tutorial coming up soon, showing you how to make cute little paper bow embellishments with your envelope punch board.  Be sure to subscribe so you don't miss this.


First line your paper up with the 3 inch mark, then punch and score, you then turn your paper anti clockwise and line your previous score line up with the little marker that sticks out.  Then punch and score again.  Simply repeat this until you have your envelope template.  Lyriclover810 shows you how to use the punch board in her video.


This is how it should look...


Now simply fold the sides of your envelope inwards and glue to secure, leaving the top open.  Homemade envelopes just look so adorable.


Now rinse and repeat until you have enough for your craft fair.  They really are addictive you won't be able to stop making them...


I have packaged mine in clear cellophane bags with 2 cards and 2 envelopes in each to make cute little note card packs.


I hope you enjoyed this tutorial and if you did why not subscribe to my blog.  You can do this by clicking the Follow icon in the sidebar or your can sign up for email subscription if you prefer.  I post every week so be sure to subscribe...

I will have more crafty things to share with you next week.
Bye for now...
Catherine
x


This post contains Amazon affiliate links...


You might enjoy...