Saturday 21 December 2019

Velvet Baubles - Make these decadent decorations for your tree, Christmas Cal...

Well hello everyone.  This is the last addition to the Christmas craft along this year and is so quick and easy you can make it in a matter of minutes.  What better way to finish our craft along than with something pretty to hang on your tree.  I have loved using the Bernat Velvet yarn so much and this is the perfect way to use up those last scraps of yarn.


Velvet Baubles


Materials

Bernat Velvet (small amounts)
Darning needle
60mm bauble
Stitch marker
Ribbon


Hook

6mm (J)

Abbreviations US Terms (UK Conversion)

sc - single crochet (double crochet)
sc2tog - single crochet 2 together (double crochet 2 together)
ch - chain
st(s) - stitch(es)
pm - place marker


Other notes:  Velvet Baubles are worked in a spiral, do not join.  Move marker up at the end of each round.

Starting with a magic loop

Round 1 ch1 (does not count as st), 6sc into ring.  Pull tight but do not join. Pm in 1st sc.


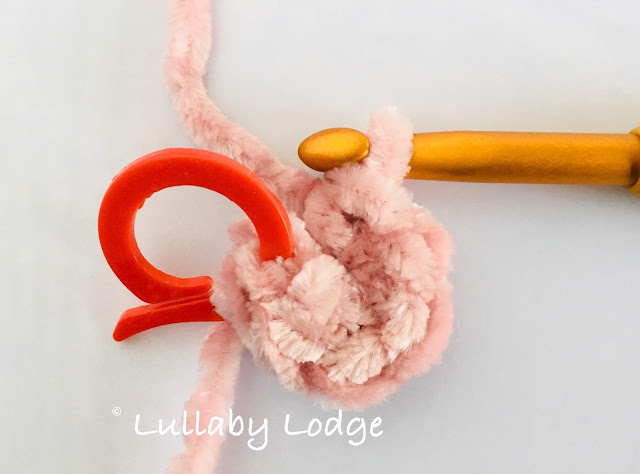
Round 2 Starting in the first sc from previous round, 2sc in each stitch around (12sc)


Round 3 [2 sc in first stitch, sc in next st] repeat around (18sc)


Round 4 [2sc in first stitch, sc in next 2 sts] repeat around (24sc)


Rounds 5-7 Sc in each st around.  

Round 8 [sc2tog, sc2] repeat around.  (18sc)

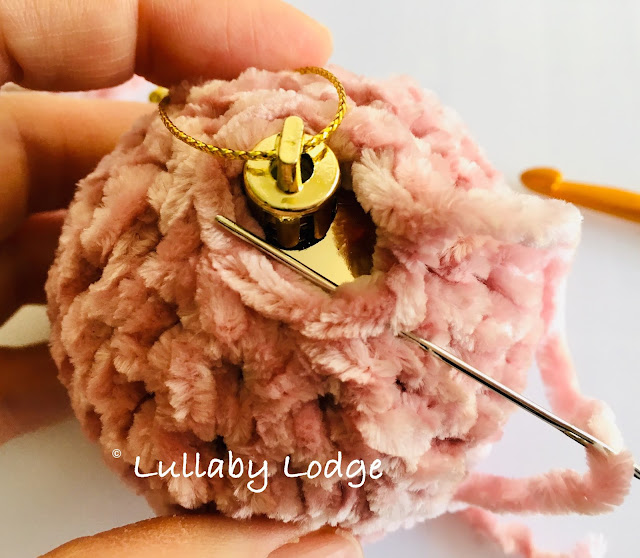
Now comes the tricky part.  Stretch your crochet over the plastic ball and continue to work around. 


Round 9 [sc2tog, sc1] repeat around.  (12sc)

Round 10 [sc2tog] repeat around.  (6sc)

Bind off, leaving a long tail and thread yarn onto a sewing needle.  Work your yarn under each stitch and pull tight.  I find it easier to pop off the top of the bauble to do this.  Bind off hiding yarn inside the crochet.  


Replace the top of your bauble and hot glue if necessary.  Add some ribbon and hang on your tree…


Pin it for later...


I hope you enjoyed the pattern and have a wonderful Christmas.

Catherine

x


Subscribe

* indicates required


Related posts...


This post contains Amazon affiliate links...


Monday 16 December 2019

Belated Temperature Blanket Update - The end of summer...

So I'm a little late with this one, OK a lot late, but better late than never right?  I have been very busy catching up with my temperature blanket over the last few days.  I have set myself a minimum of 10 rows a day in order to catch up and have now reached the end of summer, so thought I would share my progress with you.


If you would like to make a temperature blanket, you can find the

I love the summer colours, especially now that the weather is cooler, it's a reminder of those warmer days spent in the sunshine...


A little look at all the colours together so far...


We are definitely on the home stretch now and I can't wait to see it finished.  


Pin it!


I am even more excited to be starting a new temperature blanket and crochet along next year.  I will be posting the new pattern at the weekend, so make sure you are subscribed and don't miss it.

See you all soon...
Catherine
x


Subscribe

* indicates required


Related posts...


This post contains Amazon affiliate links...


Tuesday 10 December 2019

Christmas Bread & Butter Pudding - A delicious way to use up stale bread - Christmas craft along...

Hello friends.  I have something a little unusual to share with you today.  I'm not really sure if cooking counts as a craft, but I thought it would make a nice change to do something different.   I always like to cook a nice roast for Sunday lunch and finish it off with some kind of homemade pudding.  During the week we try to be a bit more healthy, so the weekend is time for treating ourselves, especially as it's almost Christmas.


Although I do love to cook, I am not really much of a baker.  All that faffing around weighing stuff and being precise, it's just not me.  I like to experiment and just chuck stuff in when I'm cooking, so I tend to stick to a few deserts that I can make, without needing to check a recipe or watch Youtube.  Bread and Butter Pudding is one of my goto puddings, as it's so simple and can be adapted to suit your mood.  One of our favourite ways of making it is with chocolate spread sandwiches.  So yummy!  So I thought why not try and make a Christmassy version.  The finished pudding was so delicious, I knew you would like to try it to, so here it is...


Christmas Bread & Butter Pudding


Ingredients (serves 6)

8 slices of bread (slightly stale is best)
Soft butter
2 tbsp sugar
4 tbsp mincemeat
A handful of dried cranberries
Orange marmalade
2 eggs
2 cups milk (or 1 cup milk, 1 cup double cream)
Icing sugar
Brandy cream


  • Grease a medium sized oven dish
  • Butter each slice of bread and lay half of them butter side down in the dish
  • Spread the other side thickly with marmalade and dot the mincemeat over the top
  • Sprinkle with cranberries
  • Lay the remaining slices of bread on top butter side up
  • In a jug whisk the eggs, milk and sugar and pour over the top of your bread slices
  • Leave for 30 minutes to allow the bread to soak up all of the custard mixture (the pudding can be frozen at this point if you want to make it in advance)
  • Bake in a medium hot oven for 30 minutes, until golden brown.  (160°C or 320°F)

Sprinkle with icing sugar...


...and serve with Brandy cream for extra decadence... 


Pin it for later...


I hope you will give this recipe a try.  What do you like to cook at Christmas?  Let me know in the comments below and make sure to subscribe for more posts like this...

Enjoy!
Catherine
x


Subscribe

* indicates required


You might also like..


This post contains Amazon affiliate links...


Sunday 8 December 2019

2020 New Year Stashdown Gorgeous Grannies Cal - Crochet a granny a day all through January...

Hello lovely people.  Is it too soon to be thinking of the new year?  I don't think so.  All the festivities of Christmas will be over before you know it and then we can all chill out with a little downtime and some nice relaxing crochet.  I always like to tackle my ever growing stash at this time of year and thought what better way to do it than with a good old crochet along.  If you are like me and your stash has taken on a life of its own, then why not join me all through January as I crochet a granny square a day.  By the end of the month we will have enough squares for a small blanket and will have made a nice dent in that stash pile.


I will be running the cal through my Facebook Group, where you will be able to share all your lovely photos.  I will post a link to that day's pattern each day and don't worry if you don't use Facebook, I will add links here too, so make sure to bookmark this page.  I am planning on using solid colours for all my squares, so the finished blanket will have a patchwork look to it.  You can use any colours you like, that's the beauty of granny squares.  Just use up that stash and make something pretty.

How To Join In


  • Check either here or on the Facebook Group each day for the pattern link.
  • Choose what weight of yarn you would like to use and correct hook for that yarn ie. 4mm hook for DK, 5mm hook for Aran / worsted.  Use this for EVERY square.
  • Follow daily instructions (each pattern may need to be altered slightly to give the correct size).
  • Feel free to post photos.
  • Once all squares are complete, check back here for finishing instructions.


Daily Pattern Links

The New Year Stashdown is here! Happy New Year everyone. Our first square is the Cosmos granny square. Remember choose either DK with 4mm hook or Aran / worsted with 5mm hook for your entire project. All equalising instructions in US terms.

Cosmos Granny Square

Follow pattern for square as written.  There are no equalizing rounds for this square.
24 sts across each side +4 corner sps


The Floral Square

Work rounds 1-3 as pattern, then continue as follows to equalise your square.
Round 4 Dc in each st and sp and [2dc, ch2, 2dc] in corners.
Round 5 Dc in each st and [2dc, ch2, 2dc] in corners.
Round 6 Sc in each st, dec 1st evenly along each side (crochet 2sts together in the centre of row), [sc, ch2, sc] in each corner, fasten off.
24 sts across each side +4 corner sps.


Lilly Pad Granny Square

Rounds 1-7 as pattern then equalise as follows
Round 8 [3dc, ch1] in each sp, [3dc, ch3, 3dc, ch1] in corners 
Round 9 hdc in each st and sp, [2hdc, ch2, 2hdc] in each corner 
Round 10 sc in each st, [sc, ch2, sc] in each corner, at the same time dec 1 st across each side (crochet 2 sts together in the centre of row).
24 sts across each side +4 corner sps


Tiptoe Through The Tulips

Work all rounds for flower centre 
Work rounds 1-5 of square 
Final round sc in each dc and ch2 sp, sc in top of each cl, [sc, ch2, sc] in each corner 
24 sts across each side +4 corner sps


Primula Square

Rounds 1-6 as pattern
Round 7 dc in each st, in corners [dc, ch2, dc]
Round 8 sc in each st, in corners [sc, ch2, sc] 
24 sts across each side +4 corner sps

Rounds 1-5 as pattern. 
Round 6 sc in each st and [sc, ch2, sc] in each corner.
24 sts across each side and 4 corner sps.


One Love Granny Square

Rounds 1-6 as pattern 
Round 7 sl st into next sp, 3dc in same sp, dc in next 3sts, in each corner [2dc, ch2, 2dc], across sides [3dc in 1st sp, 2dc in next sp, 2sc in next sp, 2dc in next sp, 3dc in last sp], join.
Round 8 sc in each st and sc, ch2, sc in corners.
24 sts across each side and 4 corner sps.


The Diane Rachael Square

Rounds 1-6 as pattern.
Round 7 repeat round 6.
Round 8 sc in each st around and [sc, ch2, sc] in each corner, at the same time inc 1 st evenly across each side (2sc in 1 st in centre of side).
24 sts across each side and 4 corner sps.


Eight Petal Flower wheel

Rounds 1-6 as pattern. 
Round 7 replace all dc with hdc.
Round 8 sc in each st and sp (apart from centre sp in each side, skip this one) and [sc, ch2, sc] in each corner. 
24 sts across each side +4 corner sps.

Rounds 1-7 as pattern.
Round 8 hdc in each st and [2hdc, ch2, 2hdc] in each corner.
Round 9 sc in each st and [sc, ch2, sc] in each corner. 
24 st across each side and 4 corner sps.

Rounds 1-6 as pattern 
Round 7 sc in each st around and [2sc, ch2, 2sc] in each corner 
24 sts across each side and 4 corner sps


Enchanted Garden

Rounds 1-6 as pattern 
Round 7 sc in each st in corners [sc, ch2, sc], at same time dec 1 st across each side (sc2tog in centre of each side). 
24 sts across each side +4 corner sps.


Crystal Square

Rounds 1-4 as pattern.
Round 5 2dc in each ch2 sp, 4dc in each ch3 sp, in corners [2dc, ch3, 2dc]. 
Round 6 sc in each st and [2sc, ch2, 2sc] in corners. 
24 sts across each side and 4 corner sps.


Popcorn 3D Flower Square

Rounds 1-6 as pattern. 
Round 7 sc in each st, inc 1 st along each side, in corners sc, ch2, sc. 
24 sts across each side.


Dreamcatcher Square

Rounds 1-6 as pattern. 
Round 7 sc in each st, inc 1 st along each side, in corners [sc, ch2, sc]. 
24 sts across each side


Rounds 1-8 as pattern. 
Round 9 sc in each st and [sc, ch2, sc] in each corner. 
24 sts across each side.


Queen Anne's Lace

Rounds 1-8 as pattern. 
Round 9 sc in each st, dec 1 st in middle of each side, in corners [sc, ch2, sc]. 
24 sts across each side


Floral Palisade Square

Rounds 1-7 as pattern. 
Round 8 sc in each st, dec 2 sts evenly across each side, in corners [sc, ch2, sc]. 
24 sts across each side.


Sofia Square


Rounds 1-6 as pattern.


Round 7 sc in each st and in corners 3sc.

Round 8 sc in each st, at same time dec 1 st across each side, [sc, ch2, sc] in each corner.

24 sts across each side.


Sublime Light Granny Square


Rounds 1-8 as pattern. 
Round 9 sc in each st and sp, dec 1 st across each side by skipping 1 dc in the centre of each side, in corners [sc, ch2, sc]. 
24 sts across each side.


Blossom Square

Rounds 1-6 as pattern.
Round 6 has a number of errors, each corner should be [3dc, ch2, 3dc] and after the last cluster st there should be a ch2.
Round 7 sc in each st, at same time dec 1 st in centre of each side, in corners [sc, ch2, sc].
24 sts across each side.


Daisy Wheel Granny Square

Rounds 1-6 as pattern. 
Round 7 dc in each st, 2dc in each sp and [2dc, ch2, 2dc] in each corner. 
Round 8 sc in each st around and [sc, ch2, sc] in each corner. 
24 sts across each side


Dahlia Pinnata

Rounds 1-6 as pattern. 
Round 7 sc in each st and 2sc in each sp, [sc, ch2, sc] in each corner. 
Round 8 sc in each st and [sc, ch2, sc] in corners. 
24 sts across each side.


Granny Square With A Flower

Rounds 1-6 as pattern 
Round 7 sc in each st and sp (sk centre sp on each side), in corners sc, ch2, sc. 
24 sts across each side.


Mangrove Square

Rounds 1-6 as pattern. 
Round 7 dc in every st, [2dc, ch2, 2dc] in corners. 
Round 8 sc in every st, dec 1 st across each side, in corners [sc, ch2, sc]. 
24 sts across each side.


Blanket Motif

Rounds 1-6 as pattern. 
Round 7-8 sc in each st, in corners [sc, ch2, sc]. 
24 sts across each side.


Rounds 1-3 as pattern. Rounds 3-6 3dc in each sp, in corners [3dc, ch2, 3dc]. Round 7 hdc in every st, in corners [2hdc, ch2, 2hdc]. Round 8 sc in every st in corners [sc, ch2, sc]. 24 sts across each side.

Rounds 1-8 as pattern. 
Round 9 dc in each st, in corners [2dc, ch2, 2dc]. 
Round 10 hdc in each st, in corners [hdc, ch2, hdc]. 
Round 11 sc in each st, in corners [sc, ch2, sc]. 
24 sts across each side.
Rounds 1-6 as pattern.
Round 7 sc in every st, inc 1 st in centre of each side, in corners [sc, ch2, sc].
24 sts across each side.


Mayan CAL Mini Taster

Rounds 1-7 as pattern. 
Round 8 hdc in every st and [2hdc, ch2, 2hdc] in corners. 
Round 9 sc in every st, inc 1 st across each side, in corners [sc, ch2, sc]
24 sts across each side.


Don't forget to share your finished squares, either on the Facebook Group, or use #lullabylodge on Instagram...


Joining Your Granny Squares

You should now have 30 granny squares and these can be joined 5 x 6 to make a small rectangular lap blanket or baby blanket. You can use any method you prefer to join your motifs. If you would like some joining ideas or are a beginner, you can read my tutorial on joining granny squares. There are 3 methods of joining, all suitable for beginners. I will be using method 3 to join my squares.


Iris Stitch Crochet Edging

Well, all the squares are finished and joined and it's now time for the border.  I wanted something pretty but simple to go with all the floral themed squares.  So I thought the Iris Stitch would make a wonderful edging to the finished blanket.  The link above will take you to the border pattern.


Blocking


To block or not to block?  Everyone has their own preferences so I am not going to tell you what to do, I will just tell you what I do.  Some people like to block each square individually before joining, this will probably give you the most professional result.  I'm afraid I tend to be a bit lazy when it comes to blocking, however this type of blanket really does benefit from something.  

For those of you who have never blocked anything or are not sure what it is, I will give a brief explanation.  Blocking is the process of setting the yarn into shape after finishing your piece.  This is done usually by two methods, wet blocking or steam blocking.  For wet blocking you would complete soak your finished crochet, gently squeeze out the excess water (usually wrapped in a towel so as not to ruin your work), pin into shape on a flat surface and leave to dry.  For steam blocking you pin out your dry finished piece and hover over it with a steam iron (do not touch your yarn with the iron) and leave to dry.  Both of these methods will give you a beautiful finish and drape to your blankets or whatever it is you are blocking.  The stitches get relaxed and softened during the process, which is why this type of blanket in particular really benefits from this procedure.

If I have any particular squares that are not quite sitting right, I will pin these out and steam them, but usually I just throw the whole blanket over the ironing board and hover over it with the steam iron.  The steam allows the stitches to relax and you can pull and ease the blanket into shape.  So for anyone that feels that blocking out 30 individual squares is a bit of a chore, you can try this option.


Pin it for later...


I can't wait to get started, I do love to bust through my stash.  I hope you will join me.  Oh and don't forget to subscribe...

Have a great day!
Catherine
x

Subscribe

* indicates required


You might also like...


This post contains Amazon affiliate links...