Sock Yarn Baubles - Let's have a Christmas craft along! New projects every week until Christmas...
Hello friends, Halloween is over and the weather is getting colder, which means we are nearing my favourite time of year. I just love Christmas and what better way to build the excitement than with some Christmas crafts.
Join me all through November and December as I try out lots of new projects with a Christmasy theme. There will be lots of crochet and other yarny crafts, kids crafts and more. Make sure you subscribe so you don't miss out on any posts, and why not join my Facebook Group too, where we can all share our Christmas makes...

Our first project for the Christmas CAL is one of my own designs. It is actually the first ever pattern I wrote on this blog and it has been updated and improved with new artwork, including round by round photos. If you would like to see the original pattern you can do so here...
.png "how to crochet sock yarn Christmas baubles")
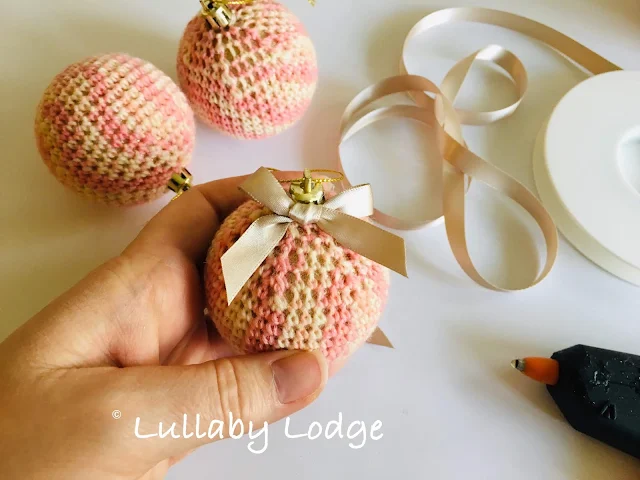
Sock Yarn Baubles
Materials
Sock yarn (small amounts)
Darning needle
Tiny bows or some ribbon
60mm bauble
Stitch marker
Glue gun
Hot glue sticks
Hook
3.5mm (E)
Abbreviations US Terms (UK Conversion)
sc - single crochet (double crochet)
sc2tog - single crochet 2 together (double crochet 2 together)
ch - chain
st(s) - stitch(es)
pm - place marker
Other notes: Sock Yarn Baubles are worked in a spiral. Do not join at the end of rounds. Move marker up at the end of each round.
Starting with a magic loop
Round 1 ch1 (does not count as st), 6sc into ring. Pull tight but do not join. Pm in 1st sc.

Round 2 Starting in the first sc from previous round 2sc in each stitch around (12sc)

Round 3 [2 sc in first stitch, sc in next st] repeat around (18sc)

Round 4 [2sc in first stitch, sc in next 2 sts] repeat around (24sc)
Rounds 5-7 Continue to increase by 6 sts in each round until you have 42sc

Rounds 8-14 Sc in each st around.

At this point try your crochet around your ball. It should be a little over half way up the bauble, when stretched. If it is not over half way you can add a few extra rounds of sc in each stitch until it looks like the photo below...

Round 15 [sc2tog, sc5] repeat around. (36sc)
Round 16 [sc2tog, sc4] repeat around. (30sc)
Round 17 [sc2tog, sc3] repeat around. (24sc)

Now comes the tricky part, stretch your crochet over the plastic ball and continue to work around. You need to stretch your crochet quite tightly, this stretches the stitches and allows your sparkly bauble to peek through the crochet.

Round 18-20 Continue to decrease 6 sts in each round until you have 6 sts.

Bind off leaving a long tail and thread yarn onto a sewing needle. work your yarn under each stitch and pull tight. I find it easier to pop off the top of the bauble to do this. Bind off hiding yarn inside the crochet.

Replace the top of your bauble and add a cute bow, attach with some hot glue.
Make lots more to fill your tree...

If you would like to help support my work an ad free pdf of this pattern is available in my Etsy Store.
I hope you enjoyed this pattern and I would love you to join in with the CAL. Be sure to share your projects in the Facebook Group and subscribe for more posts like this...
Happy hooking!
Catherine
x
You might also like...


This post contains Amazon affiliate links...

Round 2 Starting in the first sc from previous round 2sc in each stitch around (12sc)

Round 3 [2 sc in first stitch, sc in next st] repeat around (18sc)

Round 4 [2sc in first stitch, sc in next 2 sts] repeat around (24sc)
Rounds 5-7 Continue to increase by 6 sts in each round until you have 42sc

Rounds 8-14 Sc in each st around.

At this point try your crochet around your ball. It should be a little over half way up the bauble, when stretched. If it is not over half way you can add a few extra rounds of sc in each stitch until it looks like the photo below...

Round 15 [sc2tog, sc5] repeat around. (36sc)
Round 16 [sc2tog, sc4] repeat around. (30sc)
Round 17 [sc2tog, sc3] repeat around. (24sc)

Now comes the tricky part, stretch your crochet over the plastic ball and continue to work around. You need to stretch your crochet quite tightly, this stretches the stitches and allows your sparkly bauble to peek through the crochet.

Round 18-20 Continue to decrease 6 sts in each round until you have 6 sts.

Bind off leaving a long tail and thread yarn onto a sewing needle. work your yarn under each stitch and pull tight. I find it easier to pop off the top of the bauble to do this. Bind off hiding yarn inside the crochet.

Replace the top of your bauble and add a cute bow, attach with some hot glue.

Make lots more to fill your tree...

If you would like to help support my work an ad free pdf of this pattern is available in my Etsy Store.
I hope you enjoyed this pattern and I would love you to join in with the CAL. Be sure to share your projects in the Facebook Group and subscribe for more posts like this...
Happy hooking!
Catherine
x
You might also like...
This post contains Amazon affiliate links...
These look lovely! It's such fun making crocheted decorations. I usually slip a little something in with my Christmas cards!
ReplyDeleteWhat a lovely idea Sandra. It must make your cards so much more personal.
DeleteThese are so pretty! Looking forward to seeing all the other ideas you come up with.
ReplyDeleteThanks Becki. I do so love making things at Christmas. My son is looking forward to doing some kids crafts too...
Delete