Showing posts with label Craft Market. Show all posts

Friday 8 October 2021

Ditsy Daisy bunting. Decorate a childs room or pretty up your home with my pretty daisy bunting pattern...


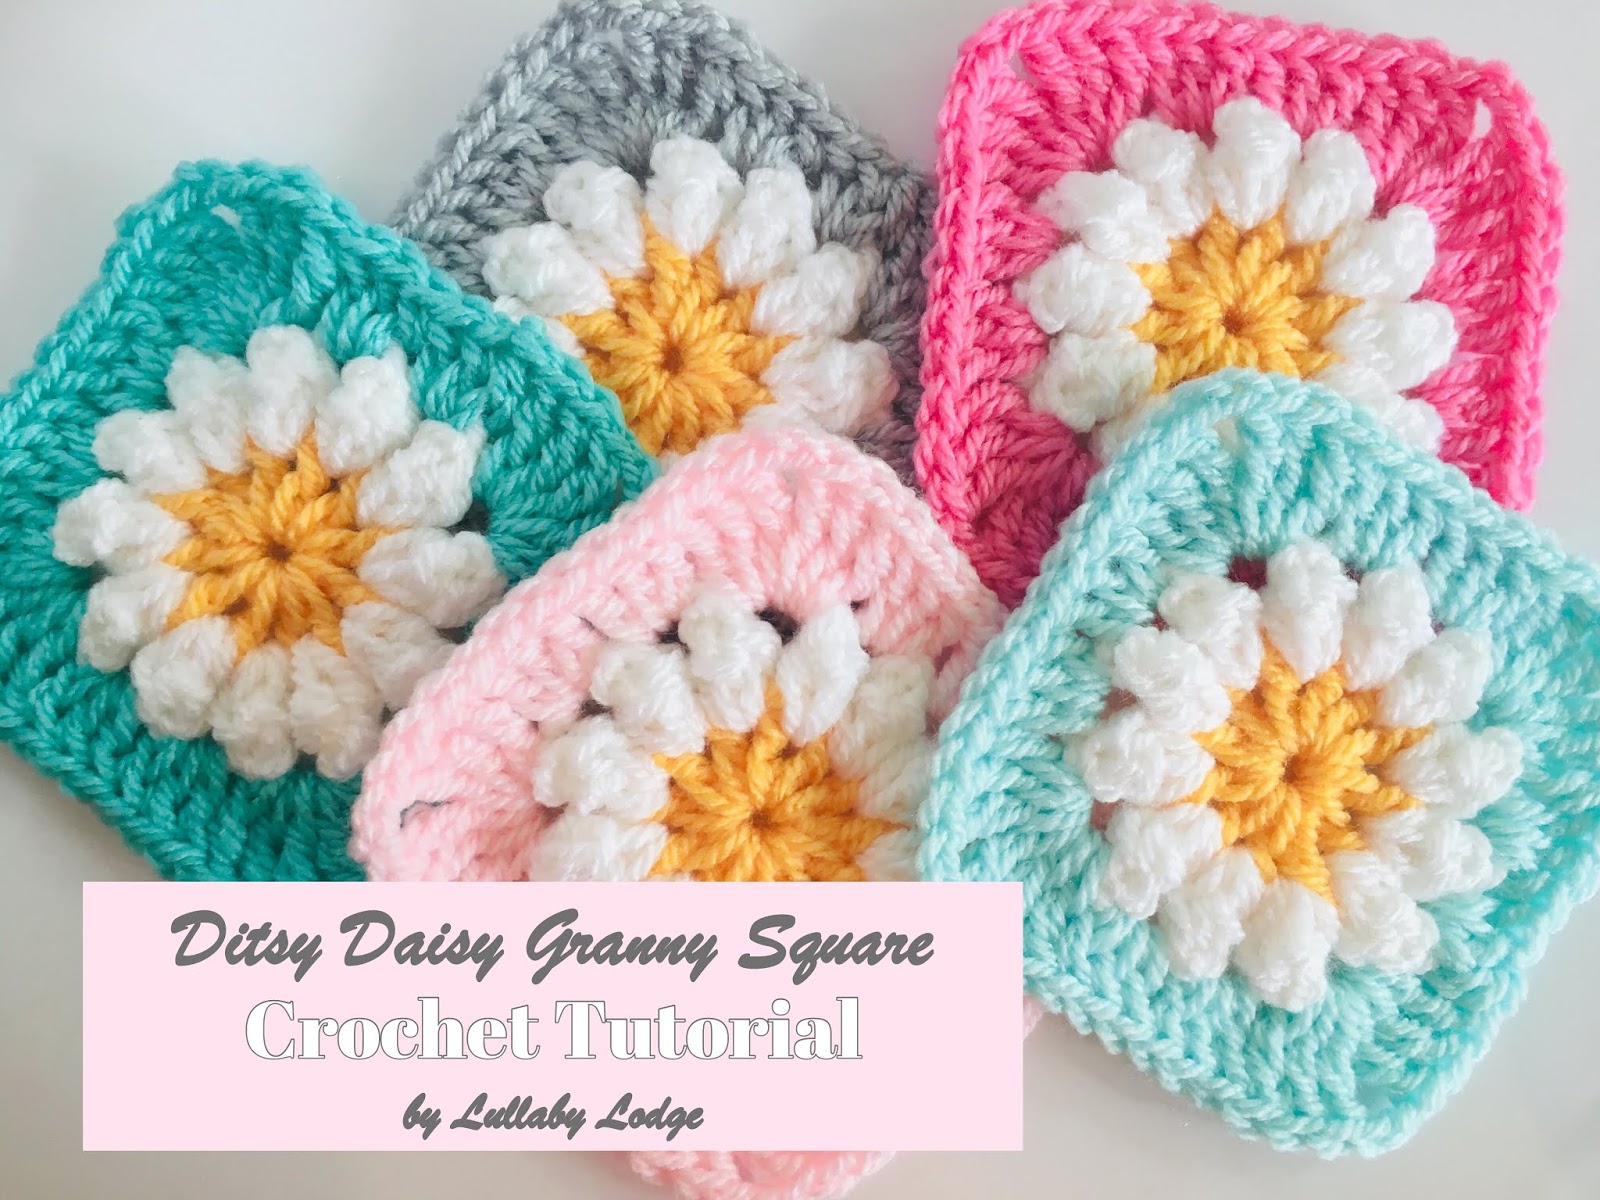
Hello friends, it's been a while again since I last posted but here we are at last and with a new pattern to share with you.  My Ditsy Daisy granny square has been so popular I thought why not use it to decorate your home.  So my granny square became a triangle and the triangle became this pretty daisy buntiing and who doesn't love a bit of bunting?


The perfect way to add a touch of colour and cheeriness to your home, or a childs room and I have made an acompanying video tutorial to work alongside the written pattern. 


As always an ad free pdf version of this pattern is available in my online stores, thank you for helping to support my work...


Ditsy Daisy Bunting


Materials

Aran / worsted yarn in various colours
5mm hook
Darning needle

Gauge

Not essential for this project

Ability

Advanced beginner

Abbreviations US Terms (UK conversion)

sc - single crochet (double crochet)
dc - double crochet (treble crochet) 
tr - treble crochet (double treble crochet)
sl st - slip stitch
ch - chain
st - stitch
sp - space
pc - popcorn
bpc - begining popcorn

Size
Adjustable


Special stitches:

Popcorn - 3dc in same st, remove hook from stitch and insert in top first dc from front to back, insert into last dc and pull loop through.

Beginning popcorn - ch3, 2dc in same sp, remove hook from st and insert in top ch3 from front to back, insert into last st loop from back to front and pull through.


Other notes:  I used Stylecraft Special Aran in colours Baby Mint, Baby Pink, Fondant, Cream, Saffron, and Aspen to make my bunting.  Depending on what type of yarn you have used you may be able to dry block your pennants by simply placing on a blocking board and leaving overnight.  Alternatively, they may be wet or steam blocked.  You can make as many pennants as you wish to adjust the size of your bunting.  I made 9 and my finished bunting measured approx 128 inches (325cm)


Daisy Pennants (make as many as you need)


With yellow, ch4 and join with sl st to form ring.

Round 1 Ch3 (counts as dc), 11dc into ring, join with sl st to top ch3.  Fasten off.  (12dc)


Round 2 With white, join in any sp, bpc in same sp, ch2, pc, ch2 in each sp around.  Join with sl st to top of 1st pc.  Fasten off.  (12pc)


Round 3 With coloured yarn, join in any sp, [ch4 (counts as tr), 2tr, ch3, 3tr] in same sp (corner formed), *[3dc in next sp] 3 times, [3tr, ch3, 3tr] in next sp,* repeat from *to* twice, [3dc in next sp] 3 times, join to top ch4 with st st.  (18tr, 27dc) 


Round 4 Ch1 (does not count as st) sc in next st and each st around, with [2sc, ch1, 2sc] in each corner.


Fasten off and weave in ends.  Block finished pennants before joining if needed.


Joining Pennants


With white ch 60


[Join to first pennant with sc in ch sp of top right corner, sc in each st across and corner sp, ch16] repeat for all pennants, ch 60.  Fasten off and weave in ends.


You bunting will look great in a childs room, used to brighten up your kitchen or even in the garden...


I hope you enjoyed this tutorial and I will be back soon with more patterns to share with you.

take care for now...

Catherine
x


You might also like...


This post may contain Amazon affiliate links...

Sunday 17 May 2020

Pretty Granny Flower Coasters - Crochet these in fresh cotton colours, perfect for spring...

Hello everyone.  I have a super quick and easy project to share with you today.  Don't you just love the instant gratification from finishing small projects?  These would also make a great gift for someone, or to sell at the craft fair.


An ad free pdf version of this pattern is available in my online stores, thank you for supporting my work...


Granny Flower Coasters


Materials

Aran / worsted weight cotton yarn small amounts
5mm hook
Darning needle


Size

Small coaster approx. 4.5 inches in diameter (12cm)
Large coaster 6,5 inches (17cm)


Ability

Easy 


Abbreviations US Terms (UK conversion)

sc - single crochet (double crochet)
dc - double crochet (treble crochet)
ch – chain
sp - space
st(s) - stitch(es)
sl st - slip stitch


Other notes: I used Scheepjes Cahlista to make my coasters, in colours, Lime, snow White and Cyan, but you can use any cotton Aran / worsted weight yarn to make yours.  

Fasten off after each round and use the photos as a guide to changing colours.  Join new colours with a sl st and if at the end of a round you wish to continue with the same colour sl st into next sp to begin round.  

I like to replace the ch3 at the start of a round with a chainless dc, you can do this if you wish or just use the traditional ch3.


Small Coaster

Ch4 and join with sl st to form ring.

Round 1 Ch3 (counts as dc), 11dc into ring, join with sl st to top ch3.  (12dc)


Round 2 Join new colour in any sp between stitches.  Ch3, dc in same sp, [2dc in next sp] repeat around, join with sl st to top ch3.  (24dc)


Round 3 Join new colour in any sp between groups of sts, ch3, 2dc in same sp, [3dc] in next sp, repeat around, join with sl st to top ch3.  (36dc)


Round 4 Join new colour in any sp between groups of sts, ch3, 2dc in same sp, ch1, [3dc in next sp, ch1] repeat around, join with sl st to top ch3.  (36dc, 12ch1 sp)


Round 5 Join new colour in any sp, ch1 (does not count as st), 2sc in same sp, sc in every st, 2sc in every sp, join with sl st to starting sc.  (60sc)


Fasten off and weave in ends.


Large Coaster

Work rounds 1-3 as small coaster.

Round 4 Join new colour in any sp, ch3, 3dc in same sp, [3dc in next sp, 4dc in next sp] repeat around ending with 3dc in last sp, join with sl st to top ch3.  (42dc)

Round 5 Ch3, 2dc in same sp, [3dc in sp in middle of 4dc, 3dc in next 2 sps] repeat around ending with 3dc in sp in middle of 4dc, 3dc in last sp, join with sl st to top ch3.  (54dc)


Round 6 Sl st to next sp, ch3, 2dc in same sp, ch1, [3dc in next sp, ch1] repeat around, join with sl st to top ch3.  (54dc, 18ch1 sp)

Round 7 Join new colour in any sp, ch1 (does n not count as st), 2sc in same sp, sc in every st, 2sc in every sp, join with sl st to starting sc.  (90sc)


Fasten off and weave in ends.


I hope you enjoy the pattern and I will be back very soon with more crochet to share with you all, so make sure you are subscribed so you don't miss a thing...

Take care
Catherine
x


You might also like...


This post contains Amazon affiliate links...


Sunday 26 April 2020

Bun Wreaths & Hair Ties - Part of the 2020 Charity Stash Bash CAL

Hello friends.  It's time for our fourth instalment of the 2020 Charity Stash Bash and this month I have a super cute project to share with you.  This would be a great addition to the shoe boxes if you are making these to donate.  They are also a great craft fair item and make a really pretty last minute gifts for someone with long hair.


Helpful Links...


An ad free pdf version of this pattern is available in my online stores, thank you for supporting my work...


If you would like to take part and prefer knit over crochet, I have linked some other pattern choices along with more crochet hair ties for you to make.  Just click the Stash Bash link above for more patterns and information. 


Bun Wreaths & Hair Ties


Materials

DK cotton yarn oddments
4mm hook
Elastic hair ties
Darning needle


Size

Varies


Ability

Easy 


Abbreviations US Terms (UK conversion)

sc - single crochet (double crochet)
dc double crochet (treble crochet)
ch – chain
sp - space
st(s) - stitch(es)
sl st - slip stitch
sk - skip


Other notes:  The bun wreaths are designed to place around a finished bun without twisting.  The Ruffled hair tie may be twisted multiple times to tie up the hair.  As the hair tie will be stretched make sure to fit as many stitches around as you can to allow for this (or you can also use as a bun wreath). 


Shell Bun Wreath


Begin by attaching your yarn to your hair tie, pull up a loop and ch 1

Round 1 Sc around your hair tie in multiples of 6 until you can’t fit any more sts (the hair tie should be completely covered), join with sl st to 1st sc.


Round 2 Ch1, sc in same st, [sk2 sts, 7dc in next st, sk2 sts, sc in next st] repeat around finishing with sk2, 7dc in next st, sk2, sl st into 1st sc.  Fasten off and weave in ends.


Arched Bun Wreath


Begin by attaching your yarn to your hair tie, pull up a loop and ch1.

Round 1 Sc around your hair tie in multiples of 4 until you can’t fit any more sts (the hair tie should be completely covered), join with sl st to 1st sc.


Round 2 Ch1, sc in same st, [ch5, sk3 sts, sc in next st] around, ending with ch5, sl st into 1st sc.


Round 3 Sl st into ch sp, ch1, 5sc in same sp and in every sp around, join with sl st to 1st sc.  Fasten off and weave in ends.


Ruffled Hair Tie


Begin by attaching your yarn to your hair tie, pull up a loop and ch1.

Round 1 Sc around your hair tie until you can’t fit any more sts (the hair tie should be completely covered, squash your sts up to allow for stretch), join with sl st to 1st sc.


Round 2 Ch1, sc in same st, [ch6, sc in next st] around ending with ch6, sl st to 1st sc.  Fasten off and weave in ends.


I hope you enjoy making these pretty hair ties and make sure to subscribe so you don't miss out on any new patterns.

See you all soon...
Catherine
x


I you love Lullaby Lodge and would like more, exclusive content, why not join my premium subscription service at Patreon.  Click the banner below to find out more...


You might also like...


This post contains Amazon affiliate links...


Wednesday 31 July 2019

Helix Ice Pop Cosy - A free pattern by Lullaby Lodge...

We are just heading into the second week of the summer holidays here in the Uk and we have had some really warm weather lately.  So what better way to cool down than with some delicious ice pops.  Your kids will love these!  These cosies will keep their little hands warm and keep the ice pops cool.  They are so quick and simple to make, you can whip them up in no time at all.


Helix Ice Pop Cosy


Materials

Aran / Worsted cotton yarn small amounts 
Darning needle
Stitch marker (optional)

Hook

4.5mm (7)

Size

Variable

Ability

Beginner

Abbreviations US Terms (UK Conversion)

sc – single crochet (double crochet)
ch - chain
sl st - slip stitch
st(s) - stitch(s)
pm - place marker

Other notes: I used Drops Paris to make my cosies, but you can use any cotton Aran / worsted weight yarn to make yours.  The cosies are made by working with two colours simultaneously in a spiral.  Move stitch marker up after each round if using.  As the size of ice pops can vary, if you find your cosy is too big, go down a hook size and if you find it is a little tight go up a hook size.


With colour A ch3 and join with sl st to form ring.

Round 1 ch1 (does not count as st), 3sc into ring, pm in first sc (if using).  Pull up a long loop so you don’t lose your stitches and remove hook.  Join colour B into ring with sl st, ch1, 3sc into ring.  (6sc)


Do not join in the round we will be working in a spiral…

Round 2 with B 2sc in each of the next 3sts.  Pull up a long loop so you don’t lose your stitches and remove hook.  Insert hook back into colour A and 2sc in each of the next 3sts.  (12sc)


Round 3 with A sc in next 6sts, with B sc in next 6sts.  (12sc)


Repeat round 3 until your cosy is desired size, (I made mine a total of 18 rounds).


Final round with A sl st into next st and fasten off, with B sl st into next st and fasten off and weave in ends.


You can really go to town with colours and they are so fast to work up you won't be able to stop at only one...


A printable ad free pdf version of this pattern may be purchased in my Etsy Store...

Pin it for later...


I hope you enjoyed this pattern and I would love to see anything you make, use the hashtag #lullabylodge on social media so I can check out your lovely work.  If you would like to see more posts like this then be sure to follow (in the sidebar) and subscribe...


See you soon
Catherine
x

Helix Ice Pop Cosy PDF 


You might also like...


This post contains Amazon affiliate links...