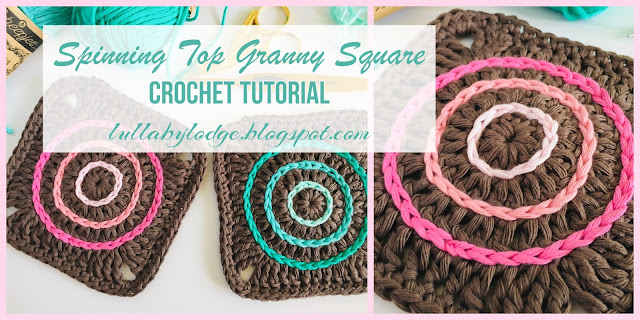
Spinning Top Granny Square
Materials
Yarn
Darning needle
Hook
Use a hook recommended on your yarn ball bandAbbreviations US Terms (UK conversion)
dc - double crochet (treble crochet)
sc - single crochet (double crochet)
ch - chain
sl st - slip stitch
st(s) - stitch(s)
sp - space
sp - space
Advanced technique: Surface crochet. Surface crochet stitches are worked over the top of your regular crochet stitches, usually after the main body of the crochet is finished. For this pattern we will only be using chain stitches to "draw" pretty patterns on top of our work.
Other notes: I used Scheepjes Cahlista (Aran) yarn to make my squares, with a 5mm (H) hook, but you can use any yarn you like, just use the hook size recommended on your yarn ball band. I like to use a chainless dc to start my rounds, you can do this if you wish or use the traditional ch3 as stated in the pattern.
With chosen yarn and hook, ch4 and sl st to form ring.
Round 1 ch3 (counts as dc, in this and every round), 11dc into ring, join with sl st to top ch3. (12dc). If you find it easier you can add a stitch marker to your first stitch; move this up each round.
Round 2 ch3, dc in same st, 2dc in each st around, join with sl st to top ch3. (24dc).
Round 3 ch3, dc in same st, [dc in next st, 2dc in next st] repeat around to last st, dc in last st, join with sl st to top ch3. (36dc).
Round 4 ch4, 2tr in same st, ch2, 3tr in next st (corner made). *Dc in next 2 sts, hdc in next 3 sts, dc in next 2 sts, 3tr in next st, ch2, 3tr in next st* repeat from *to* 3 times. Dc in next 2 sts, hdc in next 3 sts, dc in next 2 sts, join with sl st to top ch4. Fasten off and weave in ends.
Round 5 ch1 (does not count as st) sc in same place, sc in every st around and 3sc in each corner sp, join with sl st to first sc. Fasten off and weave in ends.
Insert your hook from front to back into the top of any st from round 1. Holding your yarn at the back of your work, pull up a loop. Insert your hook into the next st and pull up a loop and pull through loop on hook making a ch st. Continue to make ch sts in this way in every st from round 1. Cut yarn.
To finish off neatly, pull yarn through to the front of your work. Thread onto a darning needle and slide under the first ch st and pull through, next insert your needle into the centre of the last ch st and push through to the back of your work. Fasten off and weave in ends.
Repeat this process on rounds 2 and 3.
You can really experiment with colours and make some pretty squares...
Changing the background colour totally changes the look.
Pin it for later...
I hope you enjoyed this tutorial and have fun experimenting with surface crochet. If you would like to see more posts like this then be sure to follow (in the sidebar) and subscribe...
I will see you all very soon
Catherine
x
Spinning Top Granny Square PDF
You might also like...
This post contains Amazon affiliate links...


