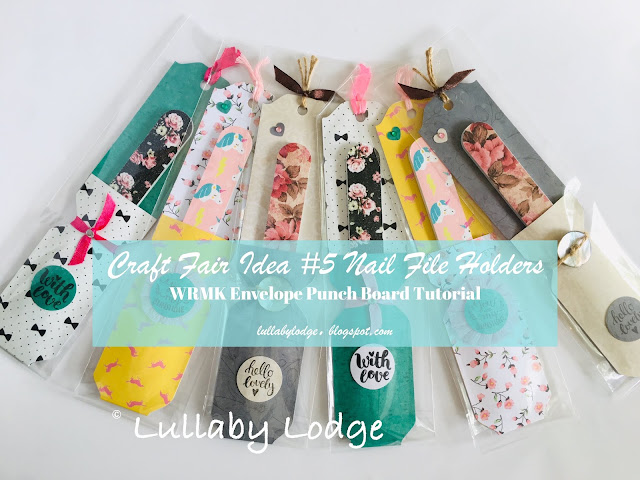
Showing posts with label 2019 Craft Fair Season. Show all posts

Monday 22 April 2019

Craft Fair Idea #5 Nail File Holders - 2019 Craft Fair Season - WRMK Envelope Punch Board Tutorial

Hello and welcome to my 2019 Craft Fair Series.  This week I have been making these really cute nail file favours.  They make wonderful teacher gifts, work colleague treats or stocking stuffers.  What?  Too soon for Christmas I hear you say?  It's never too soon to start stocking up and getting ready for the holiday season.  I got this idea from Septeria18 on Youtube and I will link her video at the end.

Nail File Holders


Materials


Designer series paper (12x12)
Envelope punch Board (optional)
Bone folder (optional)
Paper trimmer / scissors
Glue
Nail files
Scoreboard (optional)
Hole punch (optional)
Embellishments
Plastic sleeves (optional)


First cut your paper at 1 ½ inches.


Then score at 4 ¼ inches and fold along the scoreline.


Burnish with your bonefolder.  If you don't have a scoreboard or bonefolder just measure and fold.


With your paper still folded and using your We Are Memory Keepers envelope punch board, line it up at the 4 ½ inch mark.  Punch, flip over and punch again.


It should look like this...  If you don't have a punch board you can totally leave your edges straight.


Then open your paper and line up your fold line in the centre of the punch area.  Punch and flip over and punch again.


Next take your glue and adhere along the straight edges, leaving the indented parts unglued.


Like this...


You can now shape the top of your holder by lining it up as in the photo, punch flip over and punch.


This gives it a nice curved edge.  You can also punch a hole here for adding ribbon later.  Again this step is optional, you can decorate your holders however you please.


You can now slide in your nail file.  I got mine from Poundland but you can get them from Amazon, they do some really pretty ones.


Embellish however you like...


I used ribbon, twine, sticky gems, paper punches and stamps to decorate mine.


I added plastic sleeves for a more professional look and to keep them clean ready for the craft fair.


I really had fun making these and I hope you will have a go yourself, they are so easy to produce and make wonderful gifts.


If you liked this tutorial be sure to subscribe to my blog.  You can do this by hitting the follow button in the sidebar or you can sign up for email notifications.  I post a few times a week so make sure you don't miss out on any new posts.

Take care
Catherine
x

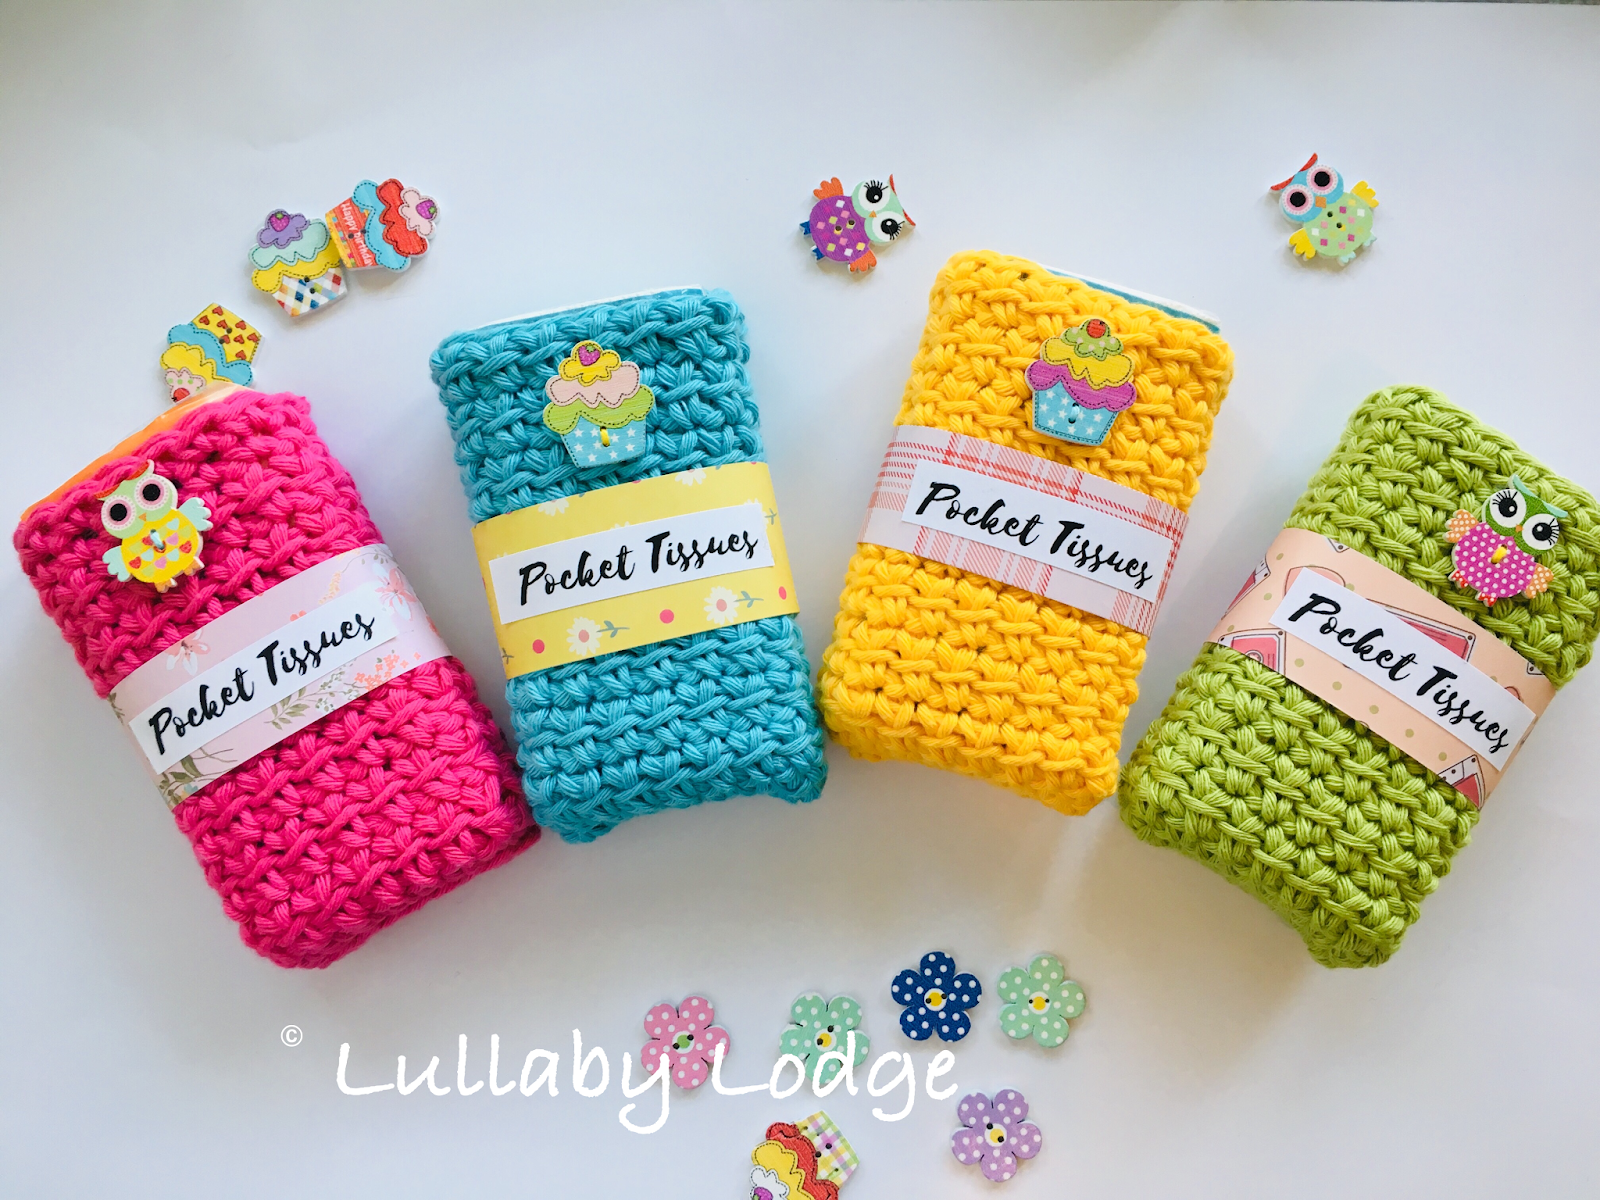
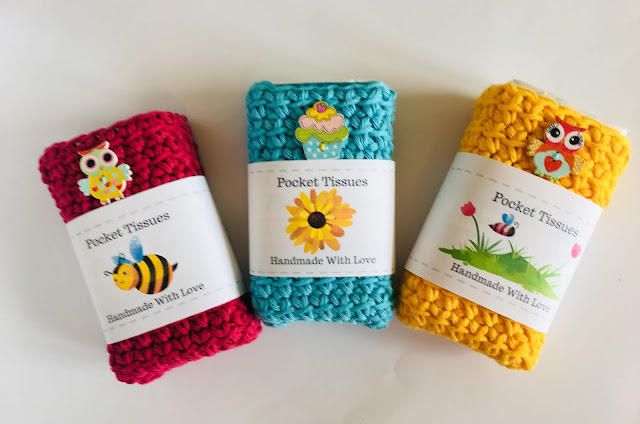
Gift Pocket Packaging Idea - Septeria18


This post contains Amazon affiliate links...


You might enjoy...

Project Life Note Card Sets


Saturday 13 April 2019

Craft Fair Idea #4 Cute Note Card Packs - 2019 Craft Fair Series

Hello friends and welcome to another addition of my 2019 craft fair series.  This week I have been making these really cute note card sets.  They are so easy to make using Project Life Cards, some designer paper and a few other crafty bits and pieces.  I have chosen to keep my designs super simple so I can mass produce them for the craft fair.  I just wanted something that will be quick and easy to make for a bargain buy.  I got this idea from one of my favourite Youtubers Lyriclover810, she makes some really beautiful things and has a great craft fair series on her channel.  You should really go check her out and I will link her video at the end...


Project Life Note Card Packs


Materials

Designer series paper
Paper trimmer or scissors
Project Life Cards (or any journaling cards)
Glue (I prefer to use tape runners)
Envelope punch board
Bone folder (optional)
Scoring board (optional) 
Corner rounder (optional)

Using a paper trimmer or scissors cut your single sided designer paper to 8 ½ inches by 4 ¼.


You now want to score this at 4 ¼ inches (this part is optional but can help to stop your paper cracking) you can go ahead and just fold this in half lengthways if you don't have a scoring board.


Use your bone folder to burnish the edges to make them nice and crisp.


For a more professional look go ahead and round your corners with a corner chomper (this is also optional, you can leave them square if you wish).  You now have a base for your card.


Pick a Project Life Card that compliments your chosen designer paper (you can buy these from Amazon I will link them at the end).


Using your prefered glue attach the Project Life Card to your base like so...


You can leave them just like this for a simple note card, or go to town with embellishments...


I added some washi tape and a cute handmade butterfly sticker to this one...


Now we need to cut either some matching or contrasting designer paper for the envelope (or you could just use printer paper for white ones).  You need to cut a square measuring 6 ¾ by 6 ¾.  Now we are going to make our envelope using the envelope punch board.  If you don't have one of these I really recommend getting one, they are so simple to use and so much fun.  You can make so many things with them not just envelopes.  I will have another tutorial coming up soon, showing you how to make cute little paper bow embellishments with your envelope punch board.  Be sure to subscribe so you don't miss this.


First line your paper up with the 3 inch mark, then punch and score, you then turn your paper anti clockwise and line your previous score line up with the little marker that sticks out.  Then punch and score again.  Simply repeat this until you have your envelope template.  Lyriclover810 shows you how to use the punch board in her video.


This is how it should look...


Now simply fold the sides of your envelope inwards and glue to secure, leaving the top open.  Homemade envelopes just look so adorable.


Now rinse and repeat until you have enough for your craft fair.  They really are addictive you won't be able to stop making them...


I have packaged mine in clear cellophane bags with 2 cards and 2 envelopes in each to make cute little note card packs.


I hope you enjoyed this tutorial and if you did why not subscribe to my blog.  You can do this by clicking the Follow icon in the sidebar or your can sign up for email subscription if you prefer.  I post every week so be sure to subscribe...

I will have more crafty things to share with you next week.
Bye for now...
Catherine
x


This post contains Amazon affiliate links...


You might enjoy...


Sunday 10 March 2019

Craft Fair Idea #3 Matchbook Notebooks - 2019 Craft Fair Season

Hello friends and welcome back to another instalment of my Craft Fair Series.  This week Little T and I have been making these super cute matchbook notebooks.  They are so much fun to make and feature a really simple design, a great project for getting the kids involved.  I got this idea from Crafty Crafts by Deanna over on Youtube and I will link her video at the end.


Craft Fair Idea #3 Matchbook Notebooks

Materials

Mini notebooks (I got mine from Ebay, they were 8 books in a pack for around £2)
Double sided tape
Designer paper 
Embellishments
Staples
Clearbags (optional)
Bone folder
Paper trimmer or scissors


First you will need to measure your notebooks to work out what size you need to cut your designer paper to.  I used a paper trimmer to cut the paper to size but you could use scissors.  We got our paper pad from The Works, they have a great selection of crafting materials at really great prices.  We used their Ombre designer pad for this project.


You then need to cover your notebooks with the designer paper using double sided tape (I used a tape runner for this).  Our notebooks were not matchbook style so I removed the front cover leaving just the notepad and card backing.


You need to kind of bend your paper around the notebook starting at the area where the papers are glued together.  Use your bone folder to burnish the edges and make nice neat folds.


Once the paper was securely glued on, I added a staple at the bottom in the centre for extra security.  Now you are ready for the fun part, the decoration.  You can embellish these any way you like.  We used some dimensional stickers we got in Poundland and some washi tape.


Little T really enjoyed decorating these, don't they look cute?


To finish them off and for a more professional look we put each notebook in individual clear bags.  You can buy these from many places, I have bought them from Ebay and The Works in the past.

I hope the children will love these at the craft fair and I will be back next week with more craft fair ideas.

Enjoy!
Catherine
x

Crafty Crafts by Deanna - Matchbook Notebooks

This post contains affiliate links...


You might like...


Listen to your favourite books while crafting with an Audible subscription...


You might enjoy...


Saturday 2 March 2019

Craft Fair Idea #2 Pocket Tissues - 2019 Craft Fair Season


Craft Fair Idea #2 Pocket Tissues


So here we are with my second instalment of my craft fair ideas.  These pocket tissue cosy's are super cute and so easy to make.  The pattern for these cosy's is one of the first patterns I ever wrote on my blog and you can find it here...

Pocket Tissue Cosy


For these cosy's I used Drops Paris with a 5mm (H) hook, which is an aran weight yarn and comes in lots of lovely bright colours.  I followed the pattern but left out the edging and button loops.  


I finished them off by adding cute buttons and some labels.  I made the labels in Canva which is a free design software but you can do something similar in Word.  I cut them out and glued them onto  designer paper to make the belly bands.


Hopefully these will be a popular item.  Everyone needs tissues right? and the buttons make them just too cute...

I hope you enjoyed this pattern, please be sure to let me know if you try these.

See you again soon
Catherine
x

I now have some printable gift labels that can be used for small crochet project such as these pocket tissues or dishcloths.  You can find these in my Etsy Store...


The labels come with a free PDF copy of the Pocket Tissue Pattern.


Ravelry Pattern Page

A printable version is also available in my Etsy Store...


This post contains affiliate links...


Saturday 16 February 2019

Craft fair idea #1 Crochet Washcloths - 2019 Craft Fair Season


Hello friends, I have an announcement to make.  This year I will be taking part in a number of craft fairs and little T will be joining me.  He is really showing an interest in making things and loves to help me out whenever he can.  Also it's a great way for him to earn a little pocket money.

I thought that this would be a nice opportunity for a blog series to document all the things we will be making and maybe you might like to try some of them out too.  We will be making a variety of items mostly small inexpensive things suitable for school fairs.  Things that children will love...

Craft Fair Idea #1

Splashtime Washcloths


My first craft fair idea is these cute cotton washcloths.  They are super fast and easy to make and are really colourful.  I think they will brighten up any craft table.  Of course Little T cannot crochet but he can help with the packaging, printing off labels, cutting them out and adding the little belly bands to each cloth.  


These would also make a great Mother's Day gift...


If you would like to make these yourself you can find  the free pattern here...


Make sure to head back next week for more craft fair ideas...

See you soon
Catherine
x
This post contains affiliate links...