
The pattern will use up those last scraps of cotton you have lying around and can be made with any gauge yarn, making it a great stash buster.
If you would like to know more about the Chaity Stash Bash CAL you can check out the links below.
Helpful Links...
An ad free pdf version of this pattern is available in my online stores, thank you for supporting my work...


If you would like to take part and prefer knit over crochet, I have linked some other pattern choices along with more crochet cases for you to make. Just click the Stash Bash link above for more patterns and information.
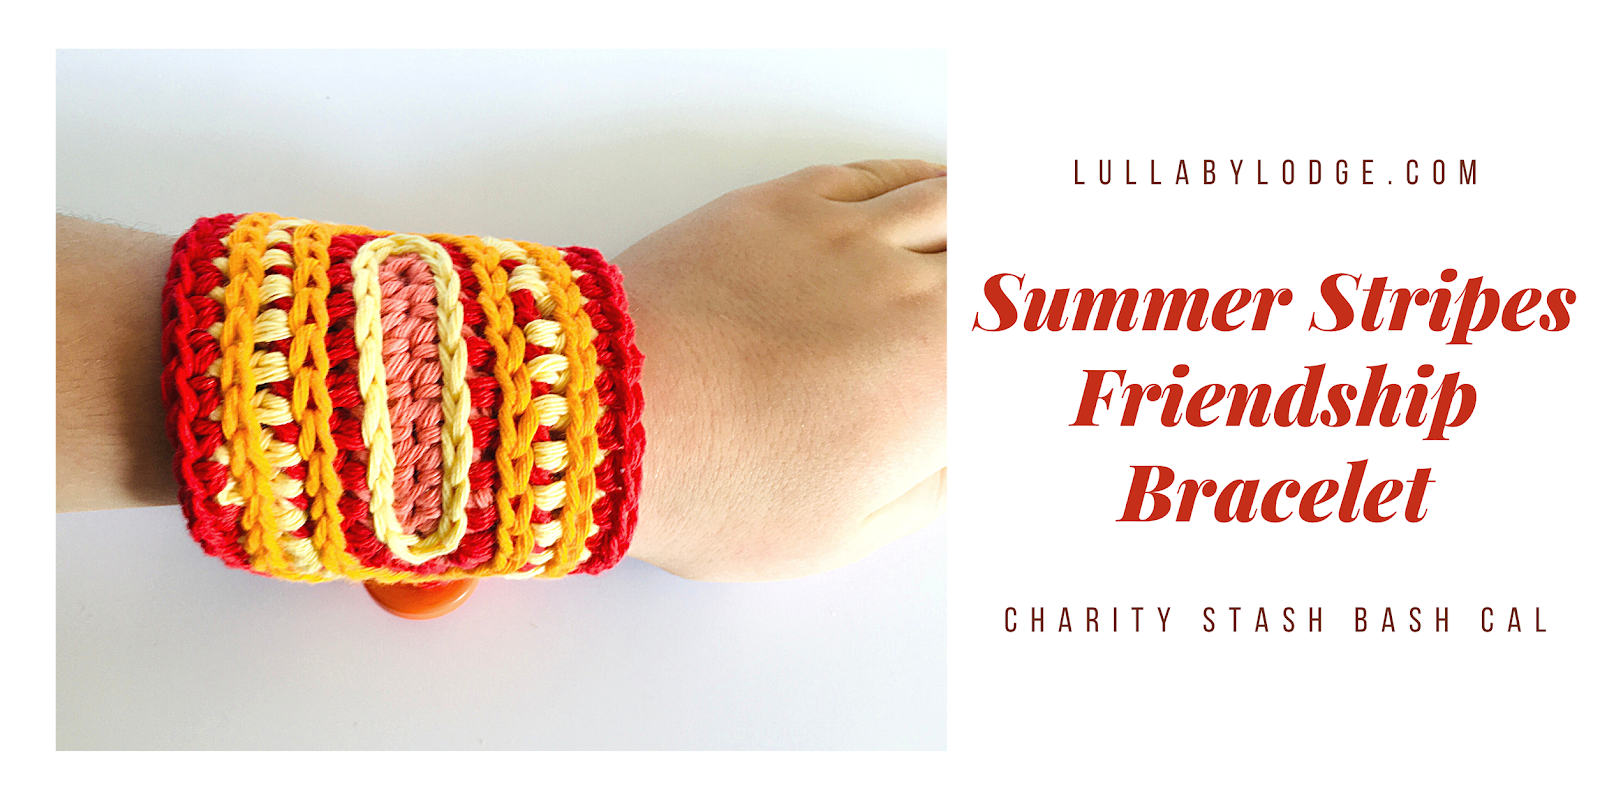
Summer Stripes Friendship Bracelet
Materials
Cotton yarn oddments in various colours
Hook recommended on yarn ball band
Darning needle
Size
Adjustable
Ability
Advanced
Abbreviations US Terms (UK conversion)
sc - single crochet (double crochet)
hdc - half double crochet
ch – chain
sp - space
st(s) - stitch(es)
sl st - slip stitch
Other
notes: Any cotton yarn in any weight may be used for this pattern. Just use the hook recommended on your yarn
ball band. Thicker weight yarns will
make for wider bracelets and finer yarns will make thinner bracelets.
Fasten off and change colours after each round. Join in new colours with a sl st. It is recommended that you work over your
ends as you go. This pattern uses the
advanced technique surface crochet.
Make your
starting chain long enough to fit just over half of yours or recipients’ wrist
size.
Round 1 Sc in 2nd ch from hook, sc in each ch until last ch, 3sc in
last ch. Continue along underside of
ch. Sc in each ch across, 2 sc in same
ch as 1st sc, join with sl st to 1st sc.
Round 2 Join in the 1st st of any 3sc group from previous round, ch1
(does not count as st), 3hdc in same st, 3hdc in next 2 sts, hdc in each st
until next 3sc group, 3hdc in next 3 sts, hdc in all remaining sts, join with
sl st to 1st hdc.
Round 3 Join in any st, hdc in each st around and 3hdc in each centre st of 3hdc
groups from previous round, join with sl st to 1st hdc.
Round 4 Join in centre st at any end, ch1 (does not count as st), sc in same st,
sc in each st around until you reach 2nd 3hdc group from previous
round, sc in next 2 sts, ch required number of sts to reach under your wrist to
the other side of bracelet and back again (button loop made), sc in same st, sc
in all remaining sts, join with sl st to 1st sc. Fasten off and weave in ends.
Surface crochet ch sts over rounds 1, 2 & 3. For round 1 you will work into the top of the
sts and for rounds 2 & 3 around the post.
Weave in all ends and sew on button.
Alternatively, you could sew on some coloured jewellery elastic to
replace the button loop (you would then sc in each st around and miss out the
button loop on round 4), this might be beneficial if you do not know the recipient’s wrist size.

I hope you have been enjoying the crochet along and have found some things to make for your favourite charity. What's your favourite charity to crochet for? Let me know in the comments below...
Take care and happy hooking!
Catherine
x
You might also like...


