
Inspired by all the lovely Granny Stripe blankets out there I wanted to create something similar in a Christmas Stocking. I searched the Internet and didn't quite find what I was looking for so decided to design a pattern myself.

This pattern is written in American terminology and is suitable for a beginner. You may use as many colours as you like, making this project perfect for stash busting.
You will need...
Main part of the stocking approximately 100g of DK
Contrast colour (heal, toe and cuff) approximately 30g of DK
Size 4 mm crochet hook (G)
Wool needle
Optional - ribbon for hanging, pom poms, buttons, bells etc. to decorate your stocking
Optional - ribbon for hanging, pom poms, buttons, bells etc. to decorate your stocking
Stitches used...
dc - double crochet
Granny cluster - 3 dc in one stitch or space
slip stitch
dc2tog - double crochet 2 together
When starting a new colour I always use a standing dc for my first stitch and a no chain dc when starting a new round with the same colour. There are some great videos showing you how to do this on YouTube here and here. You can of course use the traditional method of joining with a slip stitch and chaining 3 if you wish.
Round 1 with contrast colour starting with chain 4 join to form a loop and work 15 dc into the loop, join with a slip stitch (15 dc)
Round 2 2 dc in each stitch around (30 dc)
Round 3 [2 dc in the first stitch, 1 dc into the next stitch] repeat around (45 dc)
Round 4 [2 dc in the first stitch, 1 dc into the next 2 stitches] repeat around (60 dc)


Rounds 5-7 dc in each stitch around.


Round 8 main colour(s) [work 3 dc into the next stitch (one granny cluster formed), skip 2 stitches] repeat around (20 granny clusters)


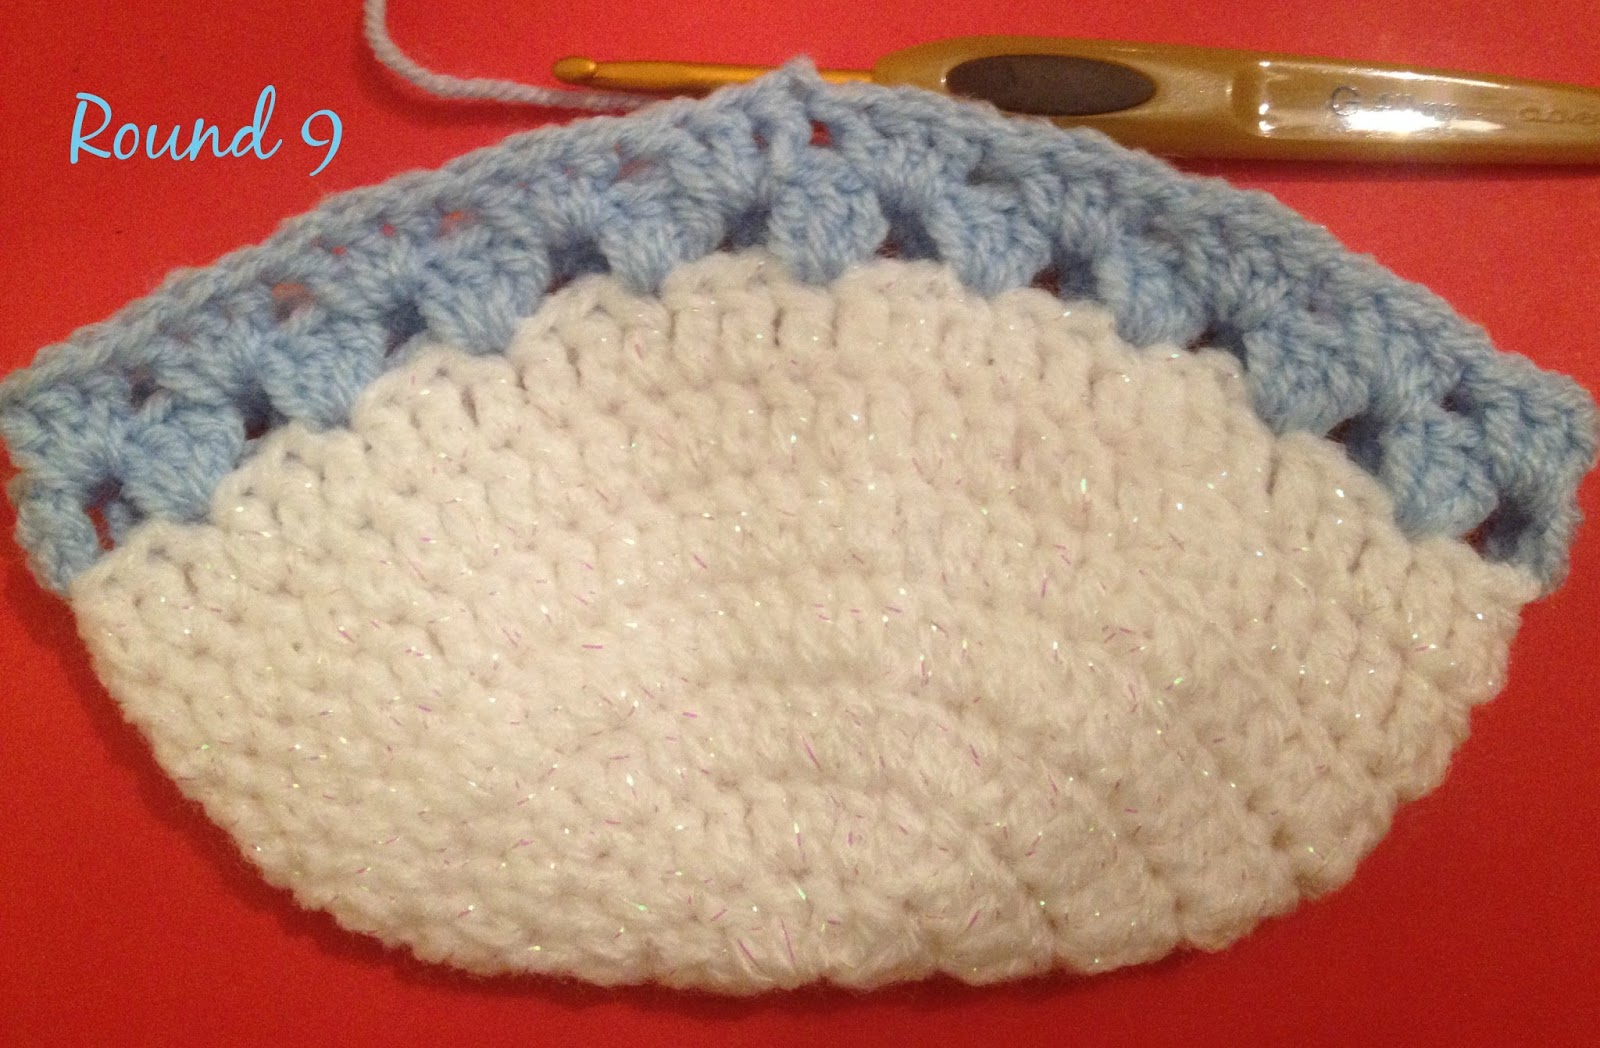
Round 9 if you are starting a new colour work a granny cluster into any space between the clusters on previous row. If continuing in same colour slip stitch across to the next space and work your granny cluster here. Continue round working a granny cluster into each space, join each round with a slip stitch.

Round 10-21 as round 9
Commence heel...
Row 1 in contrast colour starting in the first stitch of any granny cluster work 24 dc turn


Row 2 dc in the next 10 stitches, dc2tog, dc2tog, dc in the last 10 stitches turn (22 dc)
Row 3 dc in the next 9 stitches, dc2tog, dc2tog, dc in the last 9 stitches (20 dc)
Row 4 dc in the next 8 stitches, dc2tog, dc2tog, dc in the last 8 stitches (18 dc)
Row 5 dc in the next 7 stitches, dc2tog, dc2tog, dc in the last 7 stitches (16 dc)


Row 6 dc in the next 6 stitches, dc2tog, dc2tog, dc in the last 6 stitches (14 dc)
Fold the heal in half and make a slip stitch in the first stitch of previous row.

Continue in rounds...
Round 22 work a granny cluster into the space you just made with your slip stitch. Working along the side of your heel rows [skip one dc, then work a dc cluster into the side of the next dc] x3. You should now have one cluster in the space at the back of the heel and 3 clusters along the side of the heel. Now continue across the main part of the stocking working a granny cluster into each space until you get to the other side of the heel. Work a granny cluster into the side of the first dc on the heel, [skip 1 dc, granny cluster into the next dc] x2, slip stitch to join.

Round 23-45 as round 9
Begin cuff
Round 46-49 in contrast colour work 4 rounds of granny clusters
Round 50 dc in each stitch around

Round 51 working from the wrong side (this is easiest if you turn the stocking inside out) and working in back loops only dc in each stitch around
Plain cuff
Round 52-56 dc in each stitch around
Fasten off
Lace cuff
Round 52 [dc in the next stitch, skip 2 stitches, 2 dc in the next stitch, chain 2, 2 dc in the same stitch, skip 2 stitches] repeat around and join with a slip stitch
Round 53 [dc in dc from previous round, 3 dc in chain 2 space, chain 2, 3 dc in same space] repeat around and join with a slip stitch
Round 54 [sc in dc from previous round, 4 dc in chain 2 space, chain 2, 4 dc in same space] repeat around and join with a slip stitch
Round 55 [slip stitch in the next 4 dc, slip stitch in chain space, chain 3, slip stitch in first chain of chain 3, slip stitch in same chain space, slip stitch in the next 4 dc, slip stitch in next sc] repeat around and join with a slip stitch
Fasten off
Sew heel closed and weave in ends
Hanging loop...
You can either sew a loop of ribbon to the top of your stocking or simply crochet a hanging loop as follows...
Row 1 chain 21 sc in 2nd chain from hook and in every chain, bind off.
Fold in half and sew onto the top of your stocking.
Use as many or as few colours as you like...

and you can add all sorts of extras, bows, bells, pom poms. Just use your imagination. I made an applique star for this one and a lacy cuff...

I hope you like the pattern and I would love to see some photos if you make one.
Happy Christmas crafting!
Catherine
x

For daily posts please follow me over on my Facebook page.
Amazon affiliate links...
You might enjoy...
For daily posts please follow me over on my Facebook page.
Amazon affiliate links...


