Posts

Showing posts with the label tutorial
LoveCrafts

Iris Stitch Edging - Add this pretty Iris Stitch border to your blankets...

Image
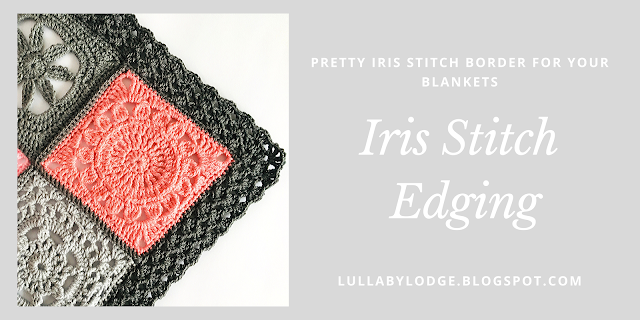
For those of you who know me well, you will know that making blankets is my most favourite thing and adding the border to a finished blanket is the best part of blanket making.  Don't get me wrong I love the whole process.  Choosing the design, colours, type of yarn, spending time all snuggly and warm with a growing blanket on your lap is pure bliss to me, but those final few rounds that add the finishing touch to your masterpiece, is just the cherry on the cake.  I love that feeling of completion  and achievement you get when you finish a blanket. As you know all through January we have been on a stash busting marathon, making a new granny square each day.  Well, all the squares are finished and joined and it's now time for the border.  I wanted something pretty but simple to go with all the floral themed squares.  So I thought the Iris Stitch would make a wonderful edging to my finished blanket and of course I must also share this with you all... Useful Links...

Tea Light Snowman - Time to get crafting with the kids and make this super cute pom pom snowman - Christmas Cal

Image
Hello everyone!  It's time for our second edition of our Christmas craft along and this week it's one for the kids to enjoy.  Little T loved making this super cute, Tea Light Snowman.  This project is great for using up scraps of yarn and fabric and is so simple to make.  This snowman will look adorable hanging from your tree this year. Tea Light Snowman Materials White yarn Scissors Glue Battery operated tea light Black marker Scraps of fabric Clover Pom Pom Maker Ribbon Start by making a large pom pom.  Little T used a Clover Pom Pom Maker for this, but, you can use your prefered method.  There are many videos on Youtube if you have never made them before.   Make sure you use plenty of yarn so your pom pom is extra fluffy. Carefully cut the yarn and tie securely. Trim into shape... Draw a face on your tea light with a black marker. Glue to the top of your pom pom Cut a strip of fabric for the s

Learn how to surface crochet and make this cute granny square - A Lullaby Lodge tutorial...

Image
Hello lovely people.  This week I thought we would take a look at surface crochet.  This is an advanced technique that can turn something really simple into something amazing.  Don't feel intimidated by it being an advanced technique, as it is actually very easy once you get the hang of it.  This project uses a basic granny square and adding some surface crochet at the end, totally transforms the look of the square. Spinning Top Granny Square Materials Yarn Darning needle Hook Use a hook recommended on your yarn ball band Abbreviations US Terms (UK conversion) dc - double crochet (treble crochet) sc - single crochet (double crochet) ch - chain sl st - slip stitch st(s) - stitch(s) sp - space Advanced technique: Surface crochet.  Surface crochet stitches are worked over the top of your regular crochet stitches, usually after the main body of the crochet is finished.  For this pattern we will only be using chain stitches to "draw&qu

How to make the perfect granny square - Updated version, a tutorial by Lullaby Lodge...

Image
Hello everyone.  I have been taking some time to look over and review some of my older tutorials and patterns and feel that some of them need a bit of refreshing.  So this week's Tutorial Tuesday will feature the first of these updated patterns.  Granny squares are one of my favourite things to crochet and so I loved making these squares to update the tutorial... You can find the updated tutorial here... I will be back again soon and don't forget to follow (in the sidebar) and subscribe for more tutorials and patterns... Take care Catherine x Related posts... This post contains Amazon affiliate links...

Learn how to crochet front post & back post stitches, in this step by step tutorial by Lullaby Lodge...

Image
I have a pattern coming out soon that utilises front post stitches, so I thought this would be a good time to do a tutorial to show you exactly how to do them.  Post stitches give a really unique look to your work and are much easier to do than they sound. Front & Back Post Stitches Materials Yarn Darning needle Hook Use a hook recommended on your yarn ball band or required by your pattern Abbreviations US Terms (UK Conversion) dc - double crochet (treble crochet) fpdc - front post double crochet (front post treble crochet) bpdc - back post double crochet (back post treble crochet) ch - chain sl st - slip stitch st(s) - stitch(s) yo - yarn over Usually when we crochet we work into the top of the stitch, but we can create exciting new effects in our work, simply by placing our stitches in a different place.  Front and back post stitches are worked in exactly the same way, the only difference is where you place your stitch.  Post stitches a